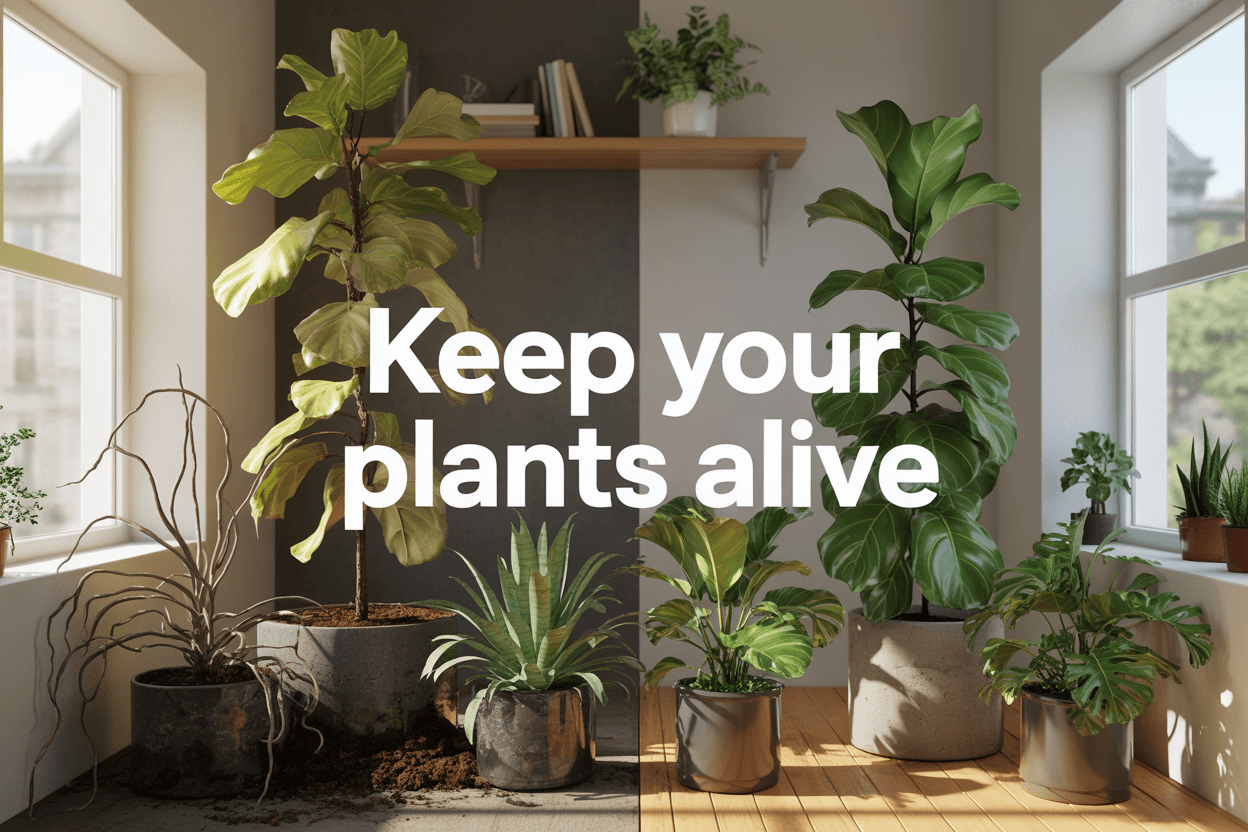
Why Most Houseplants Die (And How to Keep Yours Alive) in 2026
Last updated on January 11th, 2026 at 07:41 am
Did you know that 68% of houseplant owners have killed at least one plant in the past year? Yeah, I’ve been there too!
I remember bringing home my first fiddle leaf fig, so excited to add some green to my living room. Three weeks later? Crispy brown leaves and regret. That’s when I realized most of us are making the same critical mistakes with our indoor plants.
Here’s the thing – houseplants don’t die because you have a “black thumb.” They die because of specific, fixable problems that nobody tells you about when you buy them. After killing (and saving) dozens of plants over the years, I’ve learned that keeping houseplants alive is actually way easier than people think. You just need to understand what’s actually going wrong.
In this guide, I’ll walk you through the most common reasons houseplants die and give you practical, no-nonsense solutions that actually work. Whether you’re a complete beginner or you’ve murdered a few plants already, you’ll learn exactly how to keep your green friends thriving!
Quick Insights: Key Takeaways
- ✓ Overwatering kills more houseplants than anything else – Learn to check soil moisture before watering
- ✓ Wrong light placement is the #2 killer – Match your plant’s light needs to your home’s conditions
- ✓ Drainage is non-negotiable – Pots without holes = dead plants eventually
- ✓ Most plants prefer neglect over attention – Less is usually more with houseplants
- ✓ Humidity matters more than you think – Especially for tropical varieties
- ✓ Repotting isn’t always the answer – Know when to (and when NOT to) repot
The #1 Killer: Overwatering (Yes, You’re Probably Doing It)
Okay, confession time. I killed my first three plants by drowning them with love. Literally!
I thought more water meant more growth. I thought my plants were thirsty every time the top of the soil looked dry. I was so, so wrong. Overwatering is responsible for about 80% of houseplant deaths, and most people don’t even realize they’re doing it.
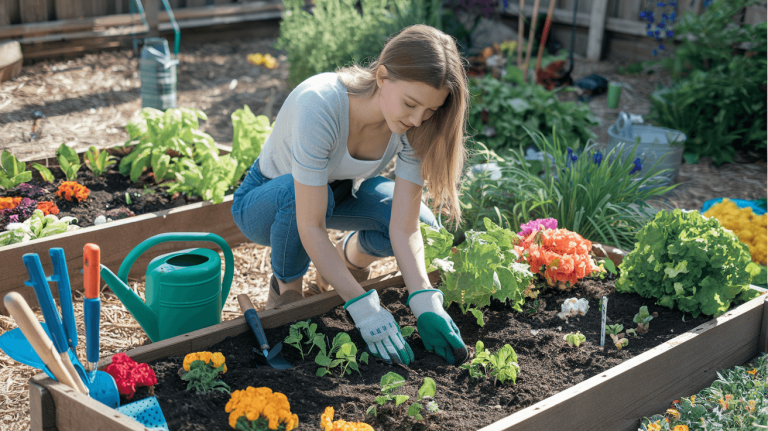
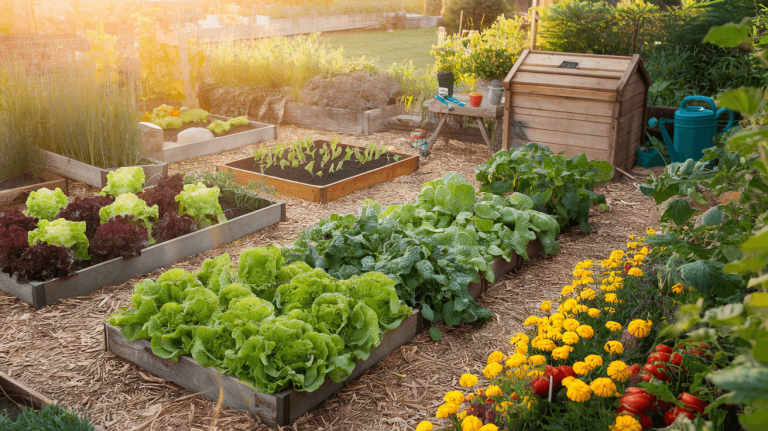
Explore the ultimate guide to growing your own organic vegetables at home.
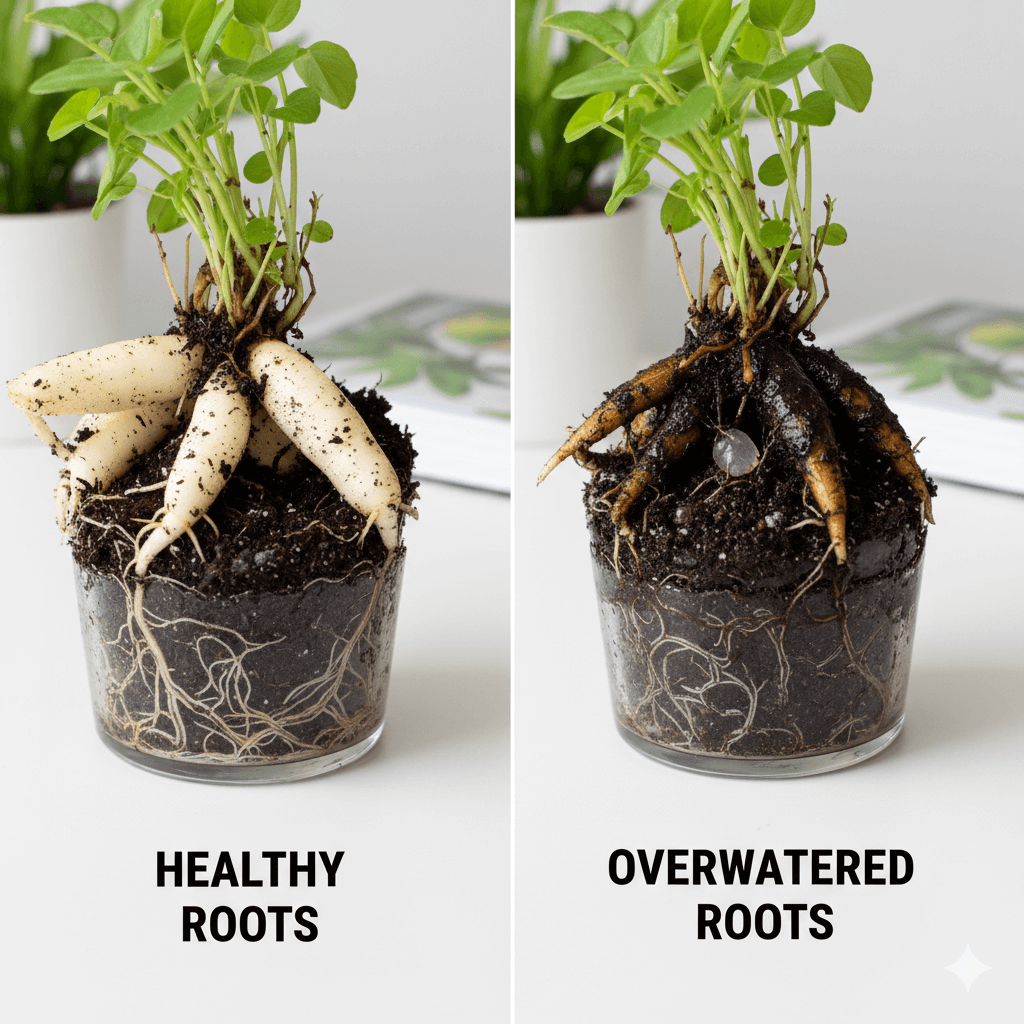
Here’s what actually happens when you overwater. The roots need oxygen to survive, right? When soil stays constantly wet, water fills all the air pockets in the soil. Your plant’s roots basically suffocate. Then they start to rot, turning black and mushy. Once root rot sets in, the plant can’t absorb water or nutrients properly. The cruel irony? Your plant starts looking thirsty even though it’s drowning!
Why Overwatering Happens
- We think plants need constant moisture – Most don’t!
- We water on a schedule instead of checking the soil
- We mistake droopy leaves for thirst when it’s actually drowning
- We don’t understand that roots need oxygen, not just water
I used to water every Sunday like clockwork. Didn’t matter if the soil was wet or dry. That’s how I killed a perfectly healthy pothos that had survived three previous owners! Now I know better. Plants don’t operate on human schedules. They need water based on their species, the season, humidity levels, pot size, and how much light they’re getting.
The worst part? Overwatering damage isn’t always obvious right away. You might not see problems for weeks. By the time you notice yellowing leaves or a weird smell, the root system is already compromised. I learned this the hard way with a beautiful peace lily. One day it looked fine, the next week it was collapsing at the base. Pulled it out and the roots were complete mush!
Using the right watering cans, soil testers, and pruning shears can make a big difference — check out these essential gardening tools for beginners to make plant care easier.
Signs Your Plant Is Overwatered
Early Warning Signs:
- Yellowing lower leaves (especially on older growth)
- Wilting despite wet soil (this one confuses people!)
- Soft, mushy stems at the base
- Fungus gnats flying around the pot (these guys LOVE wet soil)
Advanced Symptoms:
- Root rot (black, mushy, smelly roots)
- Moldy soil surface (white or green fuzz)
- Plant falling over at the base (stems have rotted)
- Foul smell from the soil (smells like rotten eggs)
The yellow leaves thing trips people up constantly. They see yellow and think “oh no, it needs MORE water!” Nope. Yellow leaves combined with wet soil = overwatering. Yellow leaves with bone-dry soil = underwatering. Big difference!
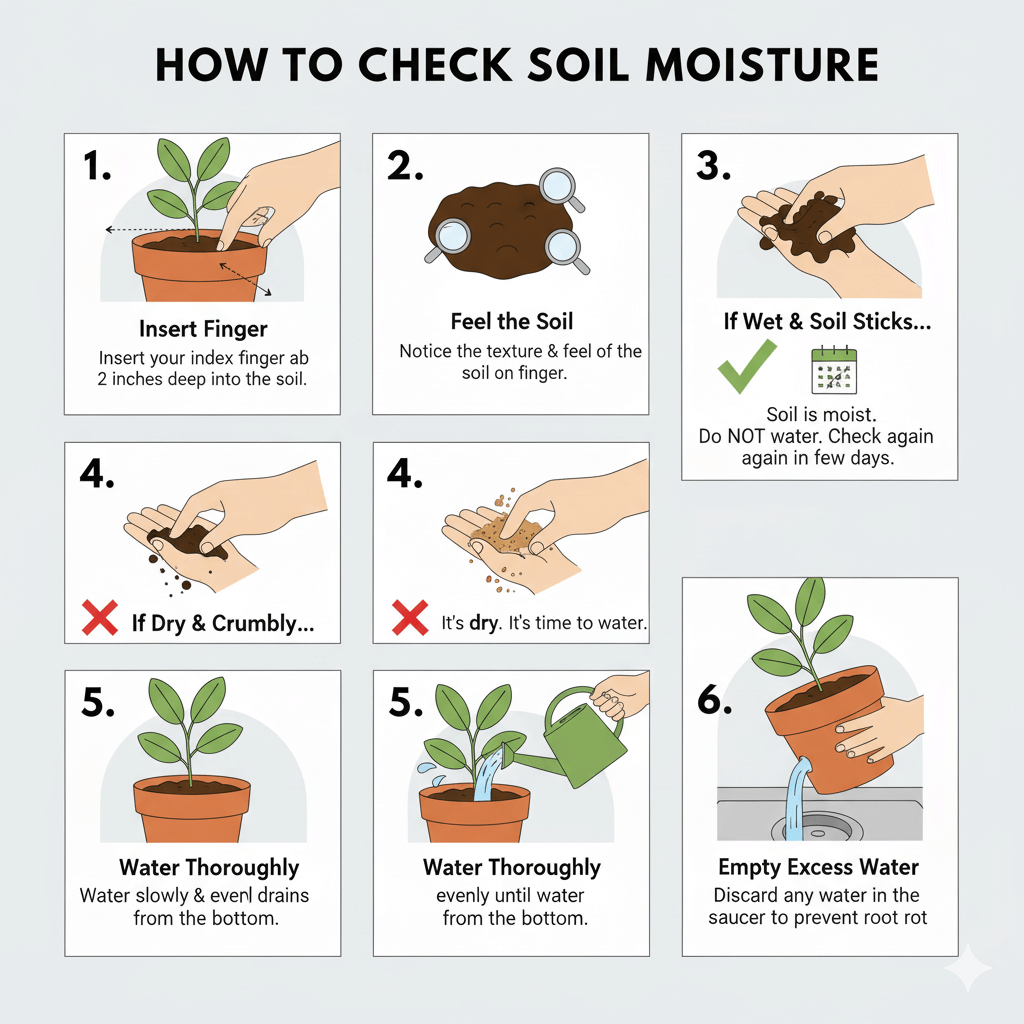
The Right Way to Water
Do This:
- ✓ Stick your finger 2 inches into the soil before watering (this is the golden rule!)
- ✓ Water thoroughly until it drains out the bottom (no light sprinkles!)
- ✓ Empty saucers after 30 minutes (don’t let plants sit in water)
- ✓ Adjust watering frequency by season (less in winter!)
- ✓ Use room temperature water (cold water shocks roots)
Don’t Do This:
- ✗ Water on a fixed schedule without checking soil
- ✗ Give small amounts of water frequently (leads to shallow roots)
- ✗ Let plants sit in standing water overnight
- ✗ Use ice cubes to water (seriously, this trend needs to die)
That ice cube thing really gets me going! I saw this “hack” online where you put ice cubes on orchids. The idea is they melt slowly. But orchids are tropical plants! They hate cold. Would you enjoy having ice dumped on your feet? Exactly. Don’t do this to your plants.
Check out creative small-space gardening ideas that actually work!
Watering Frequency Guide by Plant Type
| Plant Type | Watering Frequency | Soil Dryness Before Watering |
|---|---|---|
| Succulents/Cacti | Every 2-3 weeks | 100% dry |
| Snake Plants | Every 2-3 weeks | 100% dry |
| Pothos | Every 1-2 weeks | Top 2″ dry |
| Monstera | Every 1-2 weeks | Top 2″ dry |
| Ferns | Every 5-7 days | Top 1″ dry |
| Peace Lily | Every 7-10 days | Slightly droopy |
These are general guidelines! Your actual timing depends on your home conditions. A plant in bright light and low humidity needs water more often than the same plant in lower light and higher humidity. See what I mean about schedules being useless?
Pro Tip: I learned this the hard way after killing three beautiful pothos – get a moisture meter for $10. It takes the guesswork out completely! You just stick it in the soil and it tells you if it’s wet, moist, or dry. Changed my life, seriously. Before I got one, I was basically playing Russian roulette with my watering can.
The Light Problem: Why Your Plant Is in the Wrong Spot
Let me tell you about the time I bought a fiddle leaf fig and stuck it in the corner of my living room. You know, to “fill the space.” It got maybe an hour of indirect light per day.
That poor plant. Within two months, it dropped half its leaves and the remaining ones were pale and sad. I thought I was doing everything right! I watered correctly, I talked to it (don’t judge me), I even named it Gerald. But Gerald needed light. Lots of it!
Most people don’t realize that “bright indirect light” and “low light” mean very different things! I used to think “low light” meant any room with windows. Turns out, low light means you could barely read a book without turning on a lamp. That’s LOW. Most houseplants actually need pretty bright conditions to thrive.
Understanding Light Requirements
Light Levels Explained:
Bright Direct Light
- Location: South-facing window, sunlight hits the plant directly
- Best for: Cacti, succulents, jade plants, some herbs
- Duration: 6+ hours of direct sun daily
- Warning: Can burn many tropical houseplants (learned this with my monstera!)
This is like desert conditions. The sun is hitting your plant directly for hours. Very few common houseplants actually want this! I scorched a beautiful prayer plant by putting it in a south window. The leaves got these awful brown patches. Moved it back three feet and it recovered, but man, I felt terrible.
Bright Indirect Light
- Location: Near east or west-facing window, or a few feet from south window
- Best for: Monstera, fiddle leaf fig, most tropical plants
- Duration: 6+ hours of bright, filtered light
- This is what MOST houseplants need!
This is the sweet spot! The room is bright and you can clearly see shadows, but the sun isn’t directly hitting the leaves. Think of it like being in the shade on a sunny day. Still plenty of light, just filtered. My pothos thrives in this condition. It’s about three feet from an east-facing window and puts out new leaves constantly!
Sometimes plants die not because of neglect, but because we don’t have the right tools to maintain them. Explore this beginner-friendly gardening tools guide to help you care for your plants efficiently.
Medium Light
- Location: North-facing window or 5-8 feet from bright window
- Best for: Pothos, philodendron, snake plant, ZZ plant
- Duration: 4-6 hours of indirect light
This is where a lot of people actually put their plants. It’s not terrible, but growth will be slower. Your plants will survive but probably won’t put out tons of new growth. I have a snake plant in my bathroom that gets medium light. It’s alive and fine, but it’s grown maybe two inches in a year. Meanwhile, the one in my bedroom near the window has doubled in size!
Low Light
- Location: Room with no windows or far from any window
- Best for: Very few plants actually thrive here (ZZ plant, some pothos varieties)
- Reality check: “Low light tolerant” doesn’t mean “no light”
Here’s the truth bomb – almost no plants truly thrive in low light. They tolerate it. They survive. But they don’t flourish! I tried keeping plants in my windowless bathroom for a year. They stayed alive (barely) but looked progressively worse. Moved them to better light and they perked up within weeks.
Common Light Mistakes
Mistake #1: Assuming “Indoor Plant” Means “Any Indoor Spot”
- Just because it’s a houseplant doesn’t mean it can live in your dark bathroom
- Most houseplants are tropical and need decent light
I see this mistake constantly! People buy a beautiful plant at the nursery (where it’s getting excellent light) and immediately put it in the darkest corner of their apartment. Then they’re shocked when it dies. These plants evolved under rainforest canopies with dappled sunlight all day long. They need light!
Mistake #2: Not Rotating Your Plants
- Plants grow toward light sources (phototropism – fancy word alert!)
- Rotate 1/4 turn every week for even growth
I forgot to rotate my monstera for like three months. It grew so lopsided that it almost tipped over! Now I rotate every time I water. Takes two seconds. Makes a huge difference. Your plant will grow evenly instead of doing the leaning tower of Pisa impression.
Mistake #3: Ignoring Seasonal Changes
- Winter light is WAY less intense than summer
- You might need to move plants closer to windows in winter
This one caught me off guard my first winter with plants. I couldn’t figure out why my pothos looked so sad in December. Same watering, same location, same everything. Then I realized – the sun is lower in winter! The days are shorter! The light hitting that spot was probably 50% less intense. Moved my plants closer to the window and they improved dramatically.
Light Level Troubleshooting
Signs Your Plant Needs MORE Light:
- Leggy, stretched-out growth (stems getting long between leaves)
- Small new leaves (smaller than older leaves)
- Leaning dramatically toward the window
- Loss of variegation in variegated plants (white patches turn green)
- No new growth for months (during growing season)
The variegation thing is wild! I had a marble queen pothos that started putting out solid green leaves. I was confused until I learned that variegated plants need MORE light than their solid green cousins. The white parts don’t photosynthesize! So the plant needs extra light to compensate. Moved it to a brighter spot and the new leaves came back beautifully variegated.
Signs Your Plant Is Getting TOO MUCH Light:
- Brown, crispy leaf tips and edges
- Bleached or faded leaves (they look washed out)
- Leaves curling inward (trying to reduce surface area)
- Visible burn marks on leaves (brown patches)
My poor monstera learned this lesson. I thought “tropical plant = loves sun.” Stuck it in a south-facing window. Within two weeks, the leaves had these nasty brown patches. They looked scorched because they WERE scorched! Moved it back and trimmed the damaged leaves. The new growth came in perfect.
Quick Light Solutions
✓ Can’t provide enough natural light? Get a grow light ($20-40) – I use these in winter!
✓ Too much direct sun? Use sheer curtains to filter light – works perfectly
✓ North-facing windows only? Choose low-light tolerant plants – ZZ plants are your friend
✓ No windows in a room? Sorry, fake plants are your only option – plants need light to live, period
I resisted getting grow lights for way too long. Thought they’d be expensive and complicated. Nope! Got a simple LED grow light bulb for $25. Screwed it into a regular lamp. My plants in darker corners are thriving now! Game changer for winter.

Drainage Drama: The Secret Killer Nobody Talks About
Here’s something I wish someone had told me on day one: Pots without drainage holes are plant coffins. Period. End of story!
I learned this lesson with a gorgeous ceramic pot I bought at HomeGoods. It was perfect – the right size, beautiful turquoise color, matched my living room. No drainage hole? No problem, I thought! I’ll just be careful with watering. Famous last words, right?
That pot killed two plants before I admitted defeat. The problem is you can’t see what’s happening at the bottom. You might think the soil is mostly dry, but there’s a hidden swamp at the bottom of the pot where the roots are sitting. And sitting. And rotting.
Why Drainage Matters
- Excess water needs somewhere to go (pretty obvious, but apparently not!)
- Roots sitting in water = root rot = dead plant (every single time)
- You can’t “fix” no drainage by adding rocks at the bottom (this is a MYTH!)
That last point deserves its own rant! I can’t tell you how many websites told me to “just add pebbles at the bottom for drainage.” This doesn’t work! The water still has nowhere to go. It just sits at a slightly higher level. The rocks actually make it worse by reducing the total soil volume. Please, please don’t fall for this “hack.” I did, and it killed a beautiful philodendron.
Drainage Pros and Cons
Pots WITH Drainage Holes:
Pros:
- ✓ Prevents water buildup and root rot (the big one!)
- ✓ Flushes out excess salts and minerals from tap water/fertilizer
- ✓ Allows proper oxygen flow to roots
- ✓ Makes it harder to overwater (water runs out the bottom)
- ✓ You can water thoroughly without worry
Cons:
- ✗ Needs a saucer to catch water (minor inconvenience)
- ✗ Can be messier (but worth it!)
- ✗ May drip when moving plants (just wait 30 minutes after watering)
The pros so completely outweigh the cons here. Is it slightly less convenient? Sure. Do your plants have a way better chance of survival? Absolutely! I’ll take the minor hassle of saucers over dead plants any day.
Pots WITHOUT Drainage Holes:
Pros:
- ✓ Looks cleaner (no saucer needed)
- ✓ Good for decorative cache pots (we’ll talk about this!)
- ✓ Won’t leak on furniture
Cons:
- ✗ Very easy to overwater (dangerously easy)
- ✗ Water accumulates at bottom invisibly
- ✗ Root rot is almost inevitable long-term
- ✗ Requires precise watering (stressful and difficult!)
- ✗ Salt buildup can’t be flushed out
I used to think I could handle the “precise watering” thing. I’m an adult! I can measure water! Yeah, no. There are too many variables. Did some water evaporate? Did the plant drink more this week because it’s sunnier? Is there water hiding at the bottom I can’t see? It’s impossible to get it right consistently.
Drainage Solutions
Best Options (in order):
- Use pots with drainage holes + saucers
- This is the gold standard, seriously
- Empty saucers 30 minutes after watering (set a timer!)
- I put these felt pads under my saucers to protect furniture
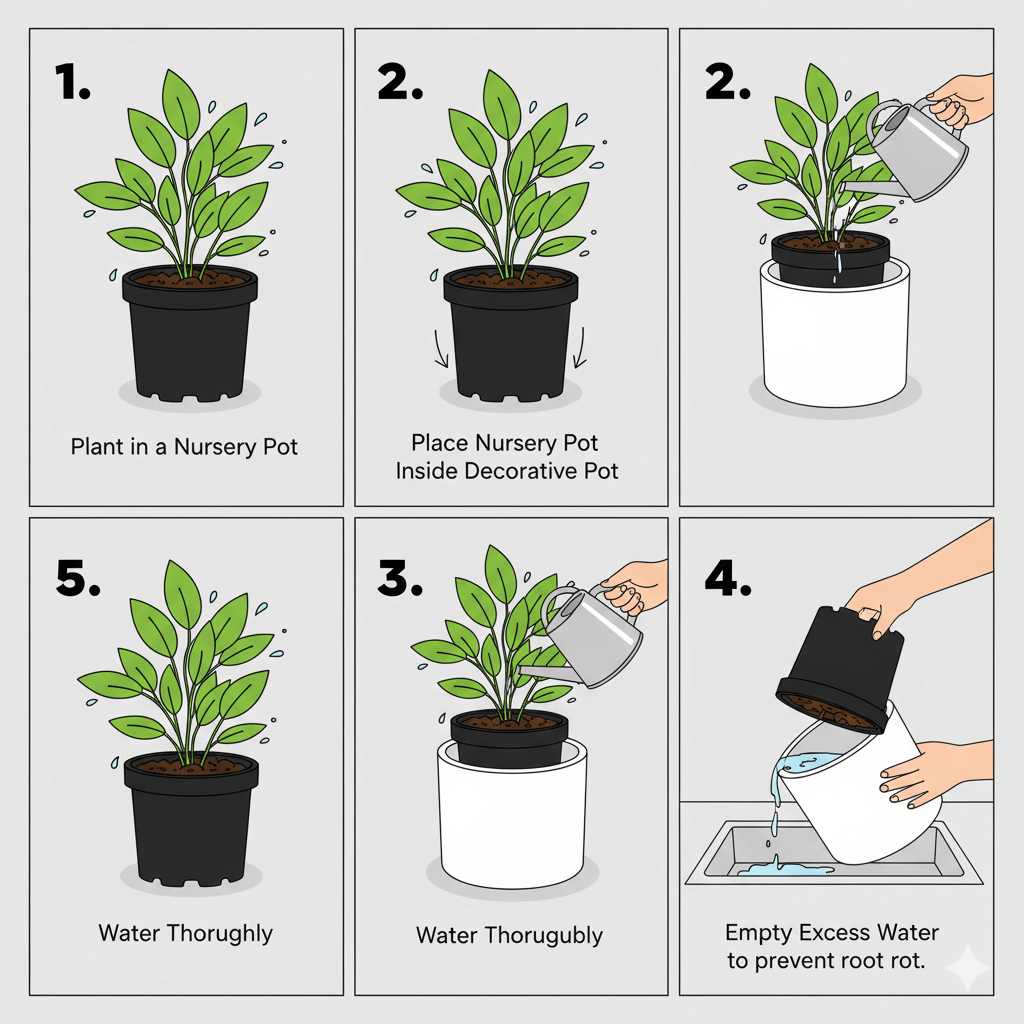
- Nursery pot inside decorative pot
- Keep plant in plastic nursery pot (the ugly one it came in)
- Place inside prettier cache pot (the decorative one)
- Remove to water, let drain completely, then return
- This is actually my favorite method! Best of both worlds.
- Drill holes in pots without drainage
- Works for ceramic and some plastic pots
- Use a masonry bit for ceramic (around $8)
- Drill underwater to prevent cracking (do this in a bucket!)
- I’ve drilled holes in probably a dozen pots now
I was terrified to drill my first pot. Watched like ten YouTube videos. Finally did it and it was fine! Wore safety goggles, went slow, kept the bit and pot in water. The pot didn’t crack! Now I drill holes in basically any pot I buy. Takes five minutes and saves plants.
- Double potting method
- Only if you MUST use a pot without holes (like for work or rental restrictions)
- Water carefully, tip pot to drain excess into sink
- Check bottom regularly by tipping pot slightly
- This is stressful and I don’t recommend it!
What NOT to Do:
- ✗ Adding rocks/gravel at the bottom (doesn’t prevent root rot! Just creates a “perched water table”)
- ✗ Using decorative pots without holes for beginners (recipe for disaster)
- ✗ Thinking you can “just be careful” with watering (you can’t, nobody can)
The science behind why rocks don’t work is pretty interesting actually! Water doesn’t drain freely through soil into rocks. It needs to be pulled by gravity and that only happens when the soil is completely saturated. So the water sits in the soil right above the rocks. Your roots are still sitting in wet soil. The rocks just made your effective pot shallower. Mind blown, right? Wish I’d known this before I killed that philodendron!
Humidity Issues: Why Your Tropical Plants Look Crispy
I used to think humidity was this complicated thing I couldn’t control. Like, what am I supposed to do, build a greenhouse in my apartment?
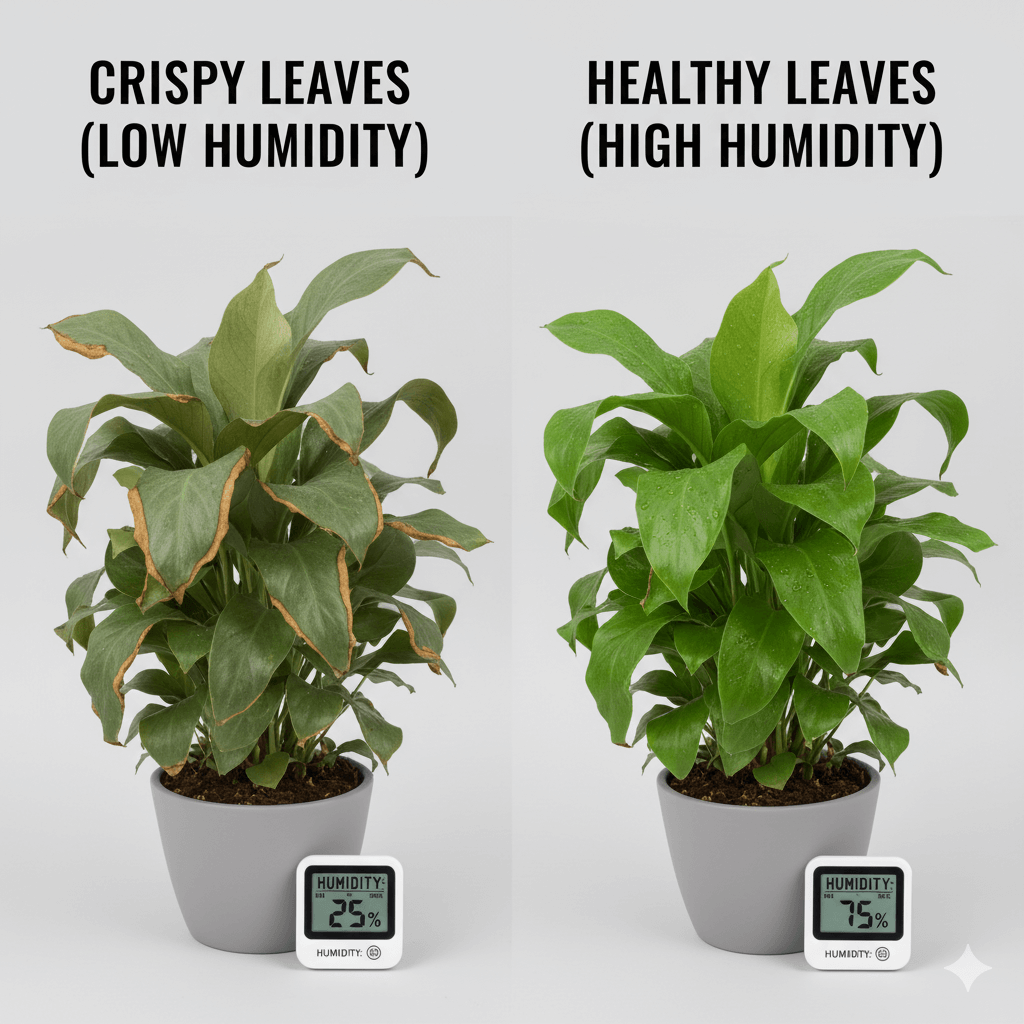
Turns out, it’s easier than you think! But I learned about humidity the hard way. Brought home a gorgeous calathea (those plants with the stunning patterned leaves). Within three weeks, the edges were brown and crispy. The leaves were curling up. It looked terrible! I was watering correctly, the light was good, so what gives?
Humidity. That’s what gives! My apartment’s humidity was hovering around 30%. That calathea wanted 60%. Big difference!
The Humidity Reality Check
What Plants Actually Need:
- Most tropical houseplants prefer 40-60% humidity
- Average homes sit at 30-40% (even lower in winter when heating is running!)
- Desert plants (cacti, succulents) are fine with low humidity
- Ferns and calatheas? They’re divas that need 50%+
Here’s what most people don’t realize. These tropical houseplants evolved in rainforests! The humidity there is like 70-90%. Constant moisture in the air. Then we bring them into our climate-controlled homes with forced air heating and AC. The shock to these plants is huge!
I checked my home’s humidity levels with a cheap hygrometer (like $10 on Amazon). Winter time? 25% humidity. That’s basically desert conditions! No wonder my tropical plants were suffering. My snake plant and succulents? They didn’t care at all. But my calathea, ferns, and prayer plant were miserable.
Signs of Low Humidity
- Brown, crispy leaf tips (the classic sign)
- Edges turning brown (like someone ran a lighter along them)
- Leaves curling inward (trying to conserve moisture)
- Spider mites (they LOVE dry conditions – more on this later)
- Slow growth during growing season
- Flowers dropping before opening fully
The spider mite thing really taught me a lesson! I had these tiny webs on my monstera. Didn’t know what they were at first. Looked it up – spider mites! They thrive in hot, dry conditions. Increased the humidity and they disappeared within two weeks. The humidity change alone was enough to make the environment hostile to them!
Humidity Solutions (From Easiest to Most Effective)
Easy Fixes:
- Mist plants 2-3 times per week (least effective, but better than nothing)
- Group plants together (they create a mini-microclimate through transpiration)
- Place plants in naturally humid rooms (bathroom, kitchen – if light is adequate)
- Move away from heating vents and AC units (these suck moisture from air)
I tried misting first because it seemed simple. Got a nice spray bottle. Misted my calathea every morning. You know how long that humidity boost lasts? About 10-20 minutes! Then it evaporates and you’re back to square one. Misting helps a tiny bit, but it’s not a real solution for humidity-loving plants.
Grouping plants actually works better than I expected! I put all my tropical plants on one shelf. The ones with bigger leaves (monstera, pothos) transpire more water. That moisture benefits the smaller plants nearby. It’s like they’re helping each other out! Plus it looks better aesthetically. Win-win.
Better Solutions:
- Pebble trays: Fill tray with pebbles and water, set pot on top
- Keep pot above water line (not sitting IN the water!)
- Water evaporates and creates humidity around the plant
I made pebble trays for my ferns. Got shallow trays from the dollar store, filled them with decorative pebbles, added water until it almost reached the top of the pebbles, then set the pots on top. The plants aren’t touching the water (which would cause root rot), but the evaporating water creates a humid microclimate. This bumped my local humidity up by maybe 10-15%. Not huge, but helpful!
Best Solutions:
- Small humidifier near plants ($25-50)
- This is what actually works for fussy plants
- Run during dry winter months
- Aim for 40-50% humidity (check with hygrometer)
After trying everything else, I bit the bullet and got a humidifier. Game changer! Seriously, best $30 I spent on plant stuff. I run it near my plant shelf for a few hours each morning. My calathea went from crispy and sad to putting out new leaves in three weeks! The difference was dramatic. The ferns unfurled. The prayer plant’s leaves looked vibrant instead of dull. Even my pothos got bushier!
Humidity: Pros and Cons of Different Methods
Misting:
- Pros: Free, easy, feels spa-like
- Cons: Effect lasts 10-20 minutes, can promote fungal issues if done at night, time-consuming
Pebble Trays:
- Pros: Inexpensive, looks nice, passive solution (no electricity needed)
- Cons: Modest humidity increase, needs refilling regularly, potential for fungus gnats if water gets stagnant
Grouping Plants:
- Pros: Free, looks good, plants help each other through transpiration
- Cons: Can spread pests faster, needs more floor space, doesn’t work for single plants
Humidifiers:
- Pros: Actually works, consistent humidity, can monitor with hygrometer
- Cons: Costs money upfront, needs refilling daily, uses electricity, can cause mold if overdone
Real Talk: After trying everything, I bit the bullet and got a $30 humidifier. My calathea went from crispy and sad to putting out new leaves in three weeks. Sometimes you just need the right tool! My advice? If you have humidity-loving plants and your home is dry (check with a $10 hygrometer), just get a small humidifier. Stop fighting it. The misting and pebble trays are band-aids. A humidifier is the actual solution.
Temperature Stress: The Silent Plant Killer
Temperature almost never gets talked about in plant care articles. Everyone focuses on water and light. But temperature stress has killed plenty of my plants over the years!
I had a beautiful dracaena sitting right next to my living room window. It was fine all summer. Then winter came. I couldn’t figure out why it was dropping leaves like crazy! The soil moisture was good, the light hadn’t changed. What was happening?
The cold window. That’s what was happening! At night, that window was dropping to maybe 50°F. The plant was right next to it. Cold stress was damaging the leaves, causing them to yellow and drop. Moved it three feet away from the window and the problem stopped immediately.
Temperature Sweet Spots
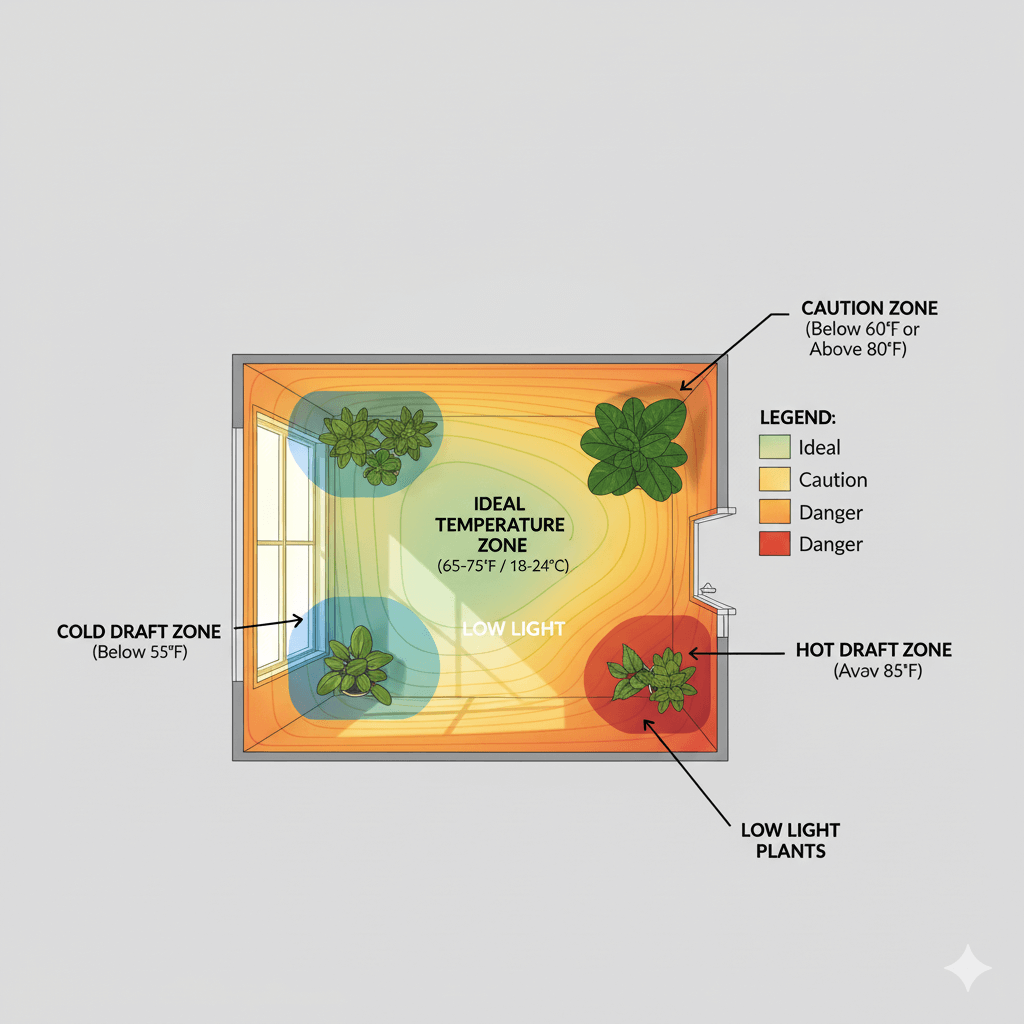
Most houseplants are tropical and prefer:
- Daytime: 65-75°F (18-24°C)
- Nighttime: 60-70°F (15-21°C)
- Temperature drop at night is natural and healthy! (mimics their native environment)
That nighttime drop is actually important! I learned this from a nursery owner. In the tropics, temperatures drop at night. Not dramatically, but they drop. A 5-10 degree difference between day and night is natural. Your plants expect it! Don’t stress if your house cools down at night. That’s actually good for them.
Common Temperature Problems
Too Cold:
- Near drafty windows in winter (this got my dracaena)
- Next to AC vents in summer (cold air blasts them)
- On cold windowsills (especially at night in winter)
- Near frequently opened doors (temperature fluctuations)
- Signs: Yellowing leaves, dropped leaves suddenly, stunted growth, wilting
I made the mistake of putting a plant on top of my AC unit one summer. Just for like a week. The cold air blowing directly on it caused the leaves to drop! I thought it would appreciate the cooling effect. Nope! The constant cold air stream was too much. Temperature stability matters more than absolute temperature.
Too Hot:
- Near heating vents (dry, hot air is terrible for plants)
- On top of appliances (refrigerators get warm on top!)
- In direct summer sun through windows (can get over 90°F)
- Near fireplaces or space heaters
- Signs: Wilting, crispy leaves, rapid soil drying (need to water daily)
My snake plant sat on top of my refrigerator for months. I thought it was a perfect spot! Good light, out of the way. But I noticed the soil was drying out super fast. The heat from the refrigerator motor was warming the pot! Plants transpire faster in heat, so it was losing moisture quickly. Moved it to a cooler spot and watering went back to normal.
Temperature Fluctuations:
- Opening doors frequently (letting in outside air)
- Seasonal transitions (spring and fall especially)
- Moving plants from store to home (huge temperature shock!)
- Near windows with big temperature swings
- Signs: Shock, dropped leaves, general sadness, delayed growth
The store-to-home transition is brutal! The plant has been living in perfect nursery conditions. Then you bring it home in your car (temperature swings), into your house (different conditions), to a new spot (new light and temperature). Give plants at least 2-3 weeks to adjust! They might drop some leaves or look sad. This is normal! Don’t overreact and change everything. Just let them acclimate.
Temperature Management Tips
Do’s
- ✓ Keep plants away from vents and drafts (check air flow in your home)
- ✓ Pull plants back from cold windows at night in winter (or use heavy curtains)
- ✓ Maintain consistent temperatures (no wild swings – plants hate surprises)
- ✓ Acclimate plants slowly when bringing them home (don’t shock them)
- ✓ Most houseplants can’t handle below 50°F (permanent damage occurs)
Don’ts
- ✗ Don’t put tropical plants outside if it’s below 60°F (cold damage is cumulative)
- ✗ Don’t place plants near fireplaces or space heaters (hot, dry air)
- ✗ Don’t blast AC directly on plants (temperature shock)
- ✗ Don’t forget that windows act like refrigerators in winter
I check my plant locations seasonally now. In winter, I pull plants back from windows and away from heating vents. In summer, I make sure no one is getting cooked in direct sun. Takes maybe 10 minutes twice a year. Prevents a ton of problems!
Fertilizer Mistakes: Too Much or Too Little
I killed a perfectly healthy snake plant by over-fertilizing. True story! The leaves got these weird brown spots and then started getting soft at the base. The whole thing just… gave up. I was devastated!
Here’s what happened. I thought more fertilizer meant faster growth. So I followed the bottle instructions (first mistake) and fertilized every two weeks in summer. By August, my snake plant was dying. Pulled it out of the pot and the roots were brown and damaged. Salt buildup from over-fertilizing had burned the roots!
The Fertilizer Truth
Lesson learned: more fertilizer does NOT mean faster growth! In fact, too much fertilizer is worse than no fertilizer at all. Plants can only use so much nutrition. The rest builds up in the soil as salt deposits. Those salts damage roots. Damaged roots can’t absorb water or nutrients. The plant suffers!
Most houseplants are slow growers anyway. They’re not racing to produce fruit or flowers. They’re just… existing. Looking pretty in your living room. They need way less fertilizer than you think!
Fertilizing Basics
When to Fertilize:
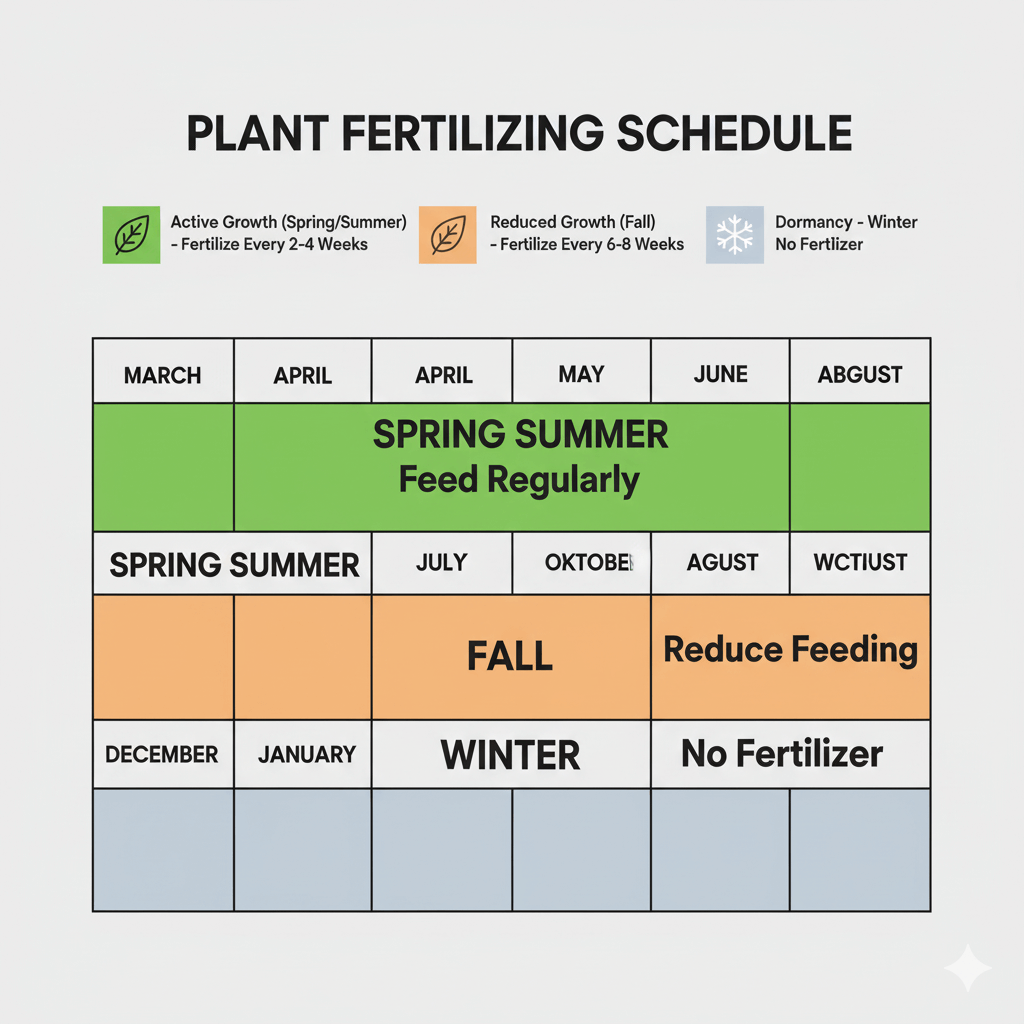
- Growing season only (spring and summer – April through September)
- Every 2-4 weeks during active growth
- Monthly for slow growers (snake plants, ZZ plants, succulents)
- NEVER in winter (most plants are dormant or semi-dormant)
When NOT to Fertilize:
- Newly repotted plants (soil has nutrients already! Wait 2-3 months)
- Sick or stressed plants (they can’t process the fertilizer)
- Dormant plants (fall/winter – they’re not growing so they don’t need food)
- Plants you just brought home (let them acclimate first)
I made the mistake of fertilizing a newly repotted plant because I wanted it to “establish faster.” Bad idea! The fresh potting soil already has nutrients. Adding fertilizer on top of that is overkill. The plant showed signs of fertilizer burn within two weeks. Now I wait at least 8 weeks after repotting before I add any fertilizer.
Signs of Over-Fertilizing
- White crust on soil surface (salt buildup – this is your warning sign!)
- Brown, crispy leaf tips (similar to low humidity, but check the soil)
- Wilting despite adequate water (roots are damaged)
- Stunted or deformed new growth (leaves come out weird shapes)
- Salt buildup on pot rim (crusty white or yellow deposits)
That white crust on the soil? That’s your plant screaming “TOO MUCH!” I see this on so many plants at big box stores. They over-fertilize to make plants look good in the store. When you see that crust, flush the soil thoroughly with plain water. Run water through the pot for a few minutes to dissolve and wash out the salt buildup.
Signs of Under-Fertilizing
- Pale or yellow leaves (but not from overwatering – check the soil first!)
- Slow or no growth during growing season (it’s June and nothing’s happening)
- Small new leaves (smaller than old leaves, getting progressively smaller)
- Overall poor plant health (just looks… sad)
- Lower leaves yellowing and dropping (plant is pulling nutrients from old leaves)
Under-fertilizing is actually less common and less problematic! Plants are way more forgiving of under-feeding than over-feeding. A slightly under-fertilized plant just grows slower. An over-fertilized plant can die!
Fertilizer: Pros and Cons
Liquid Fertilizer:
- Pros: Easy to control dosage, fast-acting, can adjust strength easily, inexpensive
- Cons: Needs regular application (every 2-4 weeks), easy to over-apply if not paying attention
- Best for: Most houseplants, people who are good about schedules
I use liquid fertilizer for almost everything. I like the control. I dilute it to 1/4 strength and add it every time I water in summer. “Weakly weekly” is better than strong monthly applications!
Slow-Release Granules:
- Pros: Apply once per season (so easy!), consistent feeding, hard to over-fertilize
- Cons: Can’t adjust if plant shows stress, more expensive upfront, takes weeks to start working
- Best for: Forgetful plant parents, low-maintenance plants
These are the little pellets you mix into soil. They release nutrients slowly over 3-6 months. I use these for my snake plants and ZZ plants – the ones I basically ignore! Works great for lazy plant care (in a good way).
Organic Options (Compost, Worm Castings):
- Pros: Gentle, improves soil structure, hard to burn plants, adds beneficial microbes
- Cons: Slower results, less precise nutrient content, can attract gnats
- Best for: Natural gardeners, people who want to avoid synthetic options
I top-dress my larger pots with worm castings in spring. Just add a layer on top of the soil. It breaks down slowly and feeds the plant gently. I’ve never had any problems with this method! Can’t burn plants with worm castings – it’s too gentle.
My Fertilizer Rules
- Dilute to 1/2 strength (yes, ignore the bottle instructions – they want you to use more!)
- Water before fertilizing (prevents root burn – roots should be hydrated)
- Less is more (you can always add more, can’t take away)
- Skip winter months (plants aren’t growing anyway – waste of fertilizer)
- Use balanced fertilizer (like 10-10-10 or 20-20-20 for most plants)
Pro Tip: I use liquid fertilizer at 1/4 strength every time I water during summer. “Weakly weekly” instead of strong monthly. Plants respond better to consistent, gentle feeding! My monstera’s growth rate doubled when I switched to this method. Instead of one new leaf per month, I’m getting 2-3!
Repotting Mistakes: When to Do It (And When Not To)
I used to repot everything the second I brought it home. Like, same day! I thought I was helping. Giving them fresh soil and a bigger home. Turns out, I was stressing them out for no reason!
Plants don’t like change. Moving them to a new pot is stressful! They have to establish new roots, adjust to new soil, adapt to the new pot size. If you repot at the wrong time or for the wrong reasons, you can seriously harm your plant.
I repotted a perfectly healthy pothos “just because.” It dropped leaves for three weeks! The new pot was way too big. The excess soil stayed wet too long. I almost caused root rot! Learned my lesson. Now I only repot when there’s an actual reason.
When Your Plant Actually NEEDS Repotting
Clear Signs:
- Roots growing out of drainage holes (actively trying to escape!)
- Water runs straight through without soaking in (roots have displaced soil)
- Plant is top-heavy and tips over (root ball is too small for plant size)
- Soil dries out in 1-2 days (roots are taking all the space)
- Roots are circling the soil surface (they’ve run out of room)
- Plant hasn’t grown in months despite good care (root-bound)
- It’s been 2+ years in the same pot (soil is depleted)
The water-running-straight-through thing is a big clue! When pots are completely root-bound, there’s barely any soil left. It’s just roots. Water can’t be absorbed because there’s no soil to hold it. It just runs out the bottom! This happened to my spider plant. I watered it and water immediately poured out. Pulled it out – complete root ball, almost no soil visible!
When Your Plant Does NOT Need Repotting
- You just bought it (wait 2-3 months minimum – let it adjust!)
- It’s currently flowering (don’t interrupt bloom cycle)
- It’s winter or fall (plant is dormant or semi-dormant)
- Plant looks stressed or sick (fix the actual problem first!)
- “Because it’s been a while” (this isn’t a valid reason alone!)
- The pot size is still adequate (if roots aren’t cramped, don’t fix what’s not broken)
I see people repotting sick plants thinking it’ll help. Bad move! If your plant is struggling, repotting adds more stress. It’s like performing surgery on someone who’s already weak. Figure out what’s actually wrong first – usually it’s watering or light issues. Once the plant is healthy and actively growing, then consider repotting if needed.
Repotting Pros and Cons
Benefits of Repotting:
- ✓ Fresh soil with new nutrients (old soil gets depleted)
- ✓ More room for root growth (allows plant to get bigger)
- ✓ Removes depleted, compacted soil (improves drainage and aeration)
- ✓ Prevents plant from becoming root-bound (being pot-bound stresses plants)
- ✓ Opportunity to check root health (can spot rot or pests)
Risks of Repotting:
- ✗ Transplant shock (plant may drop leaves or stop growing temporarily)
- ✗ Potential root damage (even careful repotting damages some fine roots)
- ✗ Increased risk of overwatering (more soil = holds more water)
- ✗ Plant may focus on roots instead of foliage growth (priorities shift)
- ✗ Can stress an already struggling plant (compounds existing problems)
Some plants actually bloom better when slightly root-bound! Peace lilies and spider plants are famous for this. They get a little cramped and think “time to reproduce!” Then they flower. If you give them too much space, they focus on growing leaves instead of flowering. Interesting, right?
Repotting Done Right
Best Practices:
Timing:
- Early spring (before active growth season starts – March/April)
- When plant is healthy and actively growing (new leaves emerging)
- On an overcast day or evening (reduces stress from strong light)
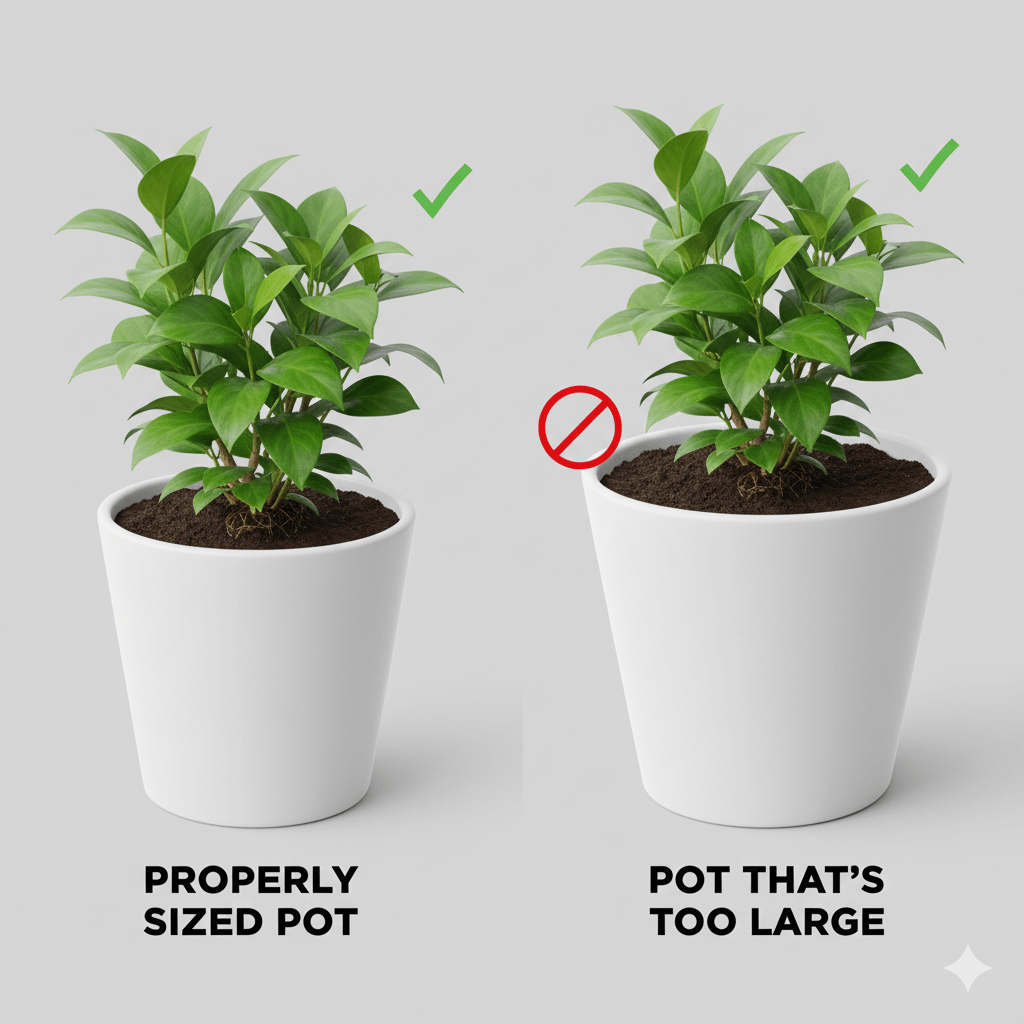
Pot Size:
- Go up ONLY 1-2 inches in diameter (seriously, resist the urge to go bigger!)
- Too big = too much soil = overwatering risk (learned this one hard way)
- Seriously, bigger is NOT better here!
This is the mistake I see constantly! People jump from a 4-inch pot to an 8-inch pot. The plant can’t use all that soil! The excess soil stays wet. Root rot happens! I did this with my monstera. Went from 6-inch to 10-inch pot. Big mistake! The soil stayed soggy. I had to repot AGAIN into a smaller pot. Such a hassle. Just go up 1-2 inches max!
Process:
- Water plant 24 hours before (hydrated plants handle stress better)
- Choose pot with drainage holes (non-negotiable!)
- Use appropriate potting mix for plant type (cacti need different soil than ferns)
- Gently loosen roots (don’t rip them! Just loosen the outer layer)
- Place in new pot, fill with soil (plant should be at same depth as before)
- Water lightly and place in indirect light for a week (recovery period)
What NOT to Do:
- ✗ Repot during winter dormancy (plant is sleeping, leave it alone!)
- ✗ Jump more than 2 pot sizes (recipe for overwatering)
- ✗ Use garden soil (too heavy! Compacts and drowns roots)
- ✗ Pack soil too tightly (roots need air pockets)
- ✗ Fertilize right after repotting (fresh soil has nutrients, wait 2 months)
Real Talk: I used to repot everything the second I brought it home. Big mistake! Now I wait at least 2-3 months to let plants adjust to my home first. Way less drama! The plant establishes in my conditions first, then I repot if needed. Survival rate went way up after I learned patience!
Pest Problems: Prevention and Treatment
Nothing makes you feel like a plant parent failure quite like discovering bugs on your plants! I found spider mites on my monstera and honestly felt betrayed. Where did they come from?? I keep my home clean!
Here’s the truth – houseplant pests happen to everyone. They hitchhike on new plants from the store. They fly in through windows. They’re in the soil sometimes! It’s not your fault. But catching them early and treating them correctly? That IS your responsibility!
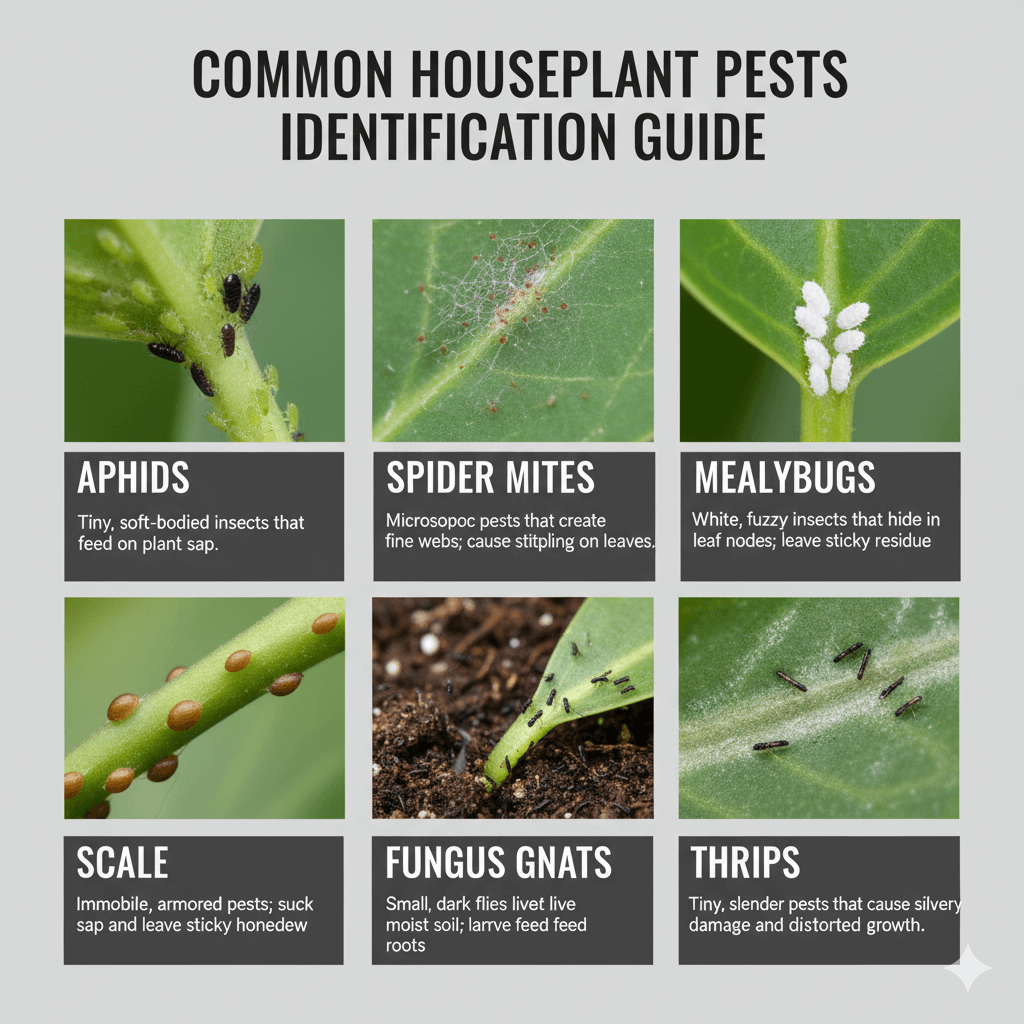
Common Houseplant Pests
Spider Mites
- Signs: Tiny webs (usually under leaves or between stems), stippled leaves (tiny yellow dots), dusty appearance on leaves
- Causes: Dry conditions (they love low humidity!), stressed plants, hitchhiking from store
- Treatment: Shower plant thoroughly, increase humidity, insecticidal soap spray, neem oil
Spider mites are THE WORST. They’re so tiny you barely see them! I thought my monstera had dust on it. Wiped a leaf and saw the “dust” moving. Tiny red/brown dots crawling around. Freaked out! Took the plant to the shower and blasted it with water. Then sprayed neem oil every three days for two weeks. Increased humidity with a humidifier. They finally disappeared!
Fungus Gnats
- Signs: Tiny flies around soil (look like fruit flies), larvae in top inch of soil (tiny white worms)
- Causes: Overwatering (they lay eggs in moist soil), organic matter in soil breaking down
- Treatment: Let soil dry out between waterings, yellow sticky traps, mosquito bits in water, hydrogen peroxide soil drench
I battle fungus gnats every winter! They’re annoying but mostly harmless. The adults don’t damage plants – the larvae eat roots but usually don’t kill plants. Still, they’re gross! I use yellow sticky traps near my plants and I’m diligent about not overwatering. Works pretty well!
Mealybugs
- Signs: White cottony clusters on stems/leaves (look like lint), sticky residue on leaves, stunted growth
- Causes: New plants from stores, stressed plants, hidden in leaf crevices
- Treatment: Rubbing alcohol on cotton swab (dab each bug), neem oil spray, systemic insecticide for bad infestations
Found these on my jade plant. Thought it was lint at first! Tried to wipe it off and it didn’t budge. Looked closer – they were bugs! Covered in white waxy coating. Disgusting! I used rubbing alcohol on a cotton swab. Dabbed each one individually. Took forever but worked! Checked daily for two weeks and killed any new ones immediately.
Scale
- Signs: Brown bumps on stems/leaves (look like part of the plant!), sticky residue, yellowing leaves
- Causes: New plants, stressed plants, hiding in bark crevices
- Treatment: Manual removal with fingernail or knife, neem oil, persistent monitoring (they’re stubborn!)
Scale insects are sneaky! They look like brown bumps on the stem. I ignored them for weeks thinking they were natural! Then I noticed the sticky residue and yellowing leaves. Looked it up – scale insects! They suck sap from plants. I scraped them off with my fingernail. So satisfying but also gross! Had to check weekly for months because they kept coming back.
Pest Prevention vs. Treatment
Prevention (Do These Regularly):
- ✓ Inspect new plants before bringing home (check under leaves, stems, soil surface)
- ✓ Quarantine new plants for 2 weeks (keep away from other plants)
- ✓ Check plants weekly during watering (early detection is everything!)
- ✓ Maintain good plant health (healthy plants resist pests better)
- ✓ Keep leaves clean (wipe with damp cloth monthly – removes eggs and pests)
- ✓ Don’t overwater (prevents fungus gnats)
- ✓ Provide adequate air circulation (stagnant air encourages pests)
The quarantine thing saved me once! I bought a beautiful pothos on sale. Put it in my bedroom away from other plants. Two days later – mealybugs! If I’d put it near my other plants immediately, the infestation would’ve spread. Dodged a bullet there!
Treatment (When Pests Appear):
- Isolate affected plant immediately (don’t let pests spread!)
- Identify the pest correctly (different pests need different treatments)
- Choose appropriate treatment method
- Treat weekly for 3-4 weeks (pest life cycles require multiple treatments)
- Check nearby plants for spread (pests don’t stay put)
The weekly treatment thing is crucial! You might kill adult bugs, but eggs are still in the soil or on leaves. They hatch in a week. If you don’t treat again, the infestation returns! I learned this with spider mites. Treated once, thought I was done. Two weeks later they were back! Now I treat at least three times, one week apart.
My Pest Management Kit
Always Keep on Hand:
- Neem oil spray (all-purpose pest treatment)
- Insecticidal soap (gentle but effective)
- Rubbing alcohol 70% (for spot-treating mealybugs)
- Cotton swabs (for dabbing alcohol on pests)
- Yellow sticky traps (fungus gnats and flying pests)
- Spray bottle (for applying treatments)
- Magnifying glass (see tiny pests like spider mites)
Cost: About $30 total, lasts for years
I keep all this stuff in a basket under my sink. When I spot a pest problem, I don’t have to run to the store! I can treat immediately. Early treatment is way easier than dealing with a full-blown infestation!
Choosing the Right Plants: Match Plant to Environment
This is something I wish I’d known from the start: Not every plant will work in every home! I can’t tell you how much money and heartbreak I would’ve saved if someone had told me this upfront.
I used to buy plants because they were pretty. Didn’t matter if my apartment could support them! I bought a fiddle leaf fig (needs bright light) for a corner that got maybe 2 hours of dim light per day. I bought a calathea (needs high humidity) when my apartment was 30% humidity in winter. These plants never stood a chance!
Now I’m strategic. I assess my home’s conditions FIRST. Then I choose plants that will actually thrive here. Revolutionary, I know!
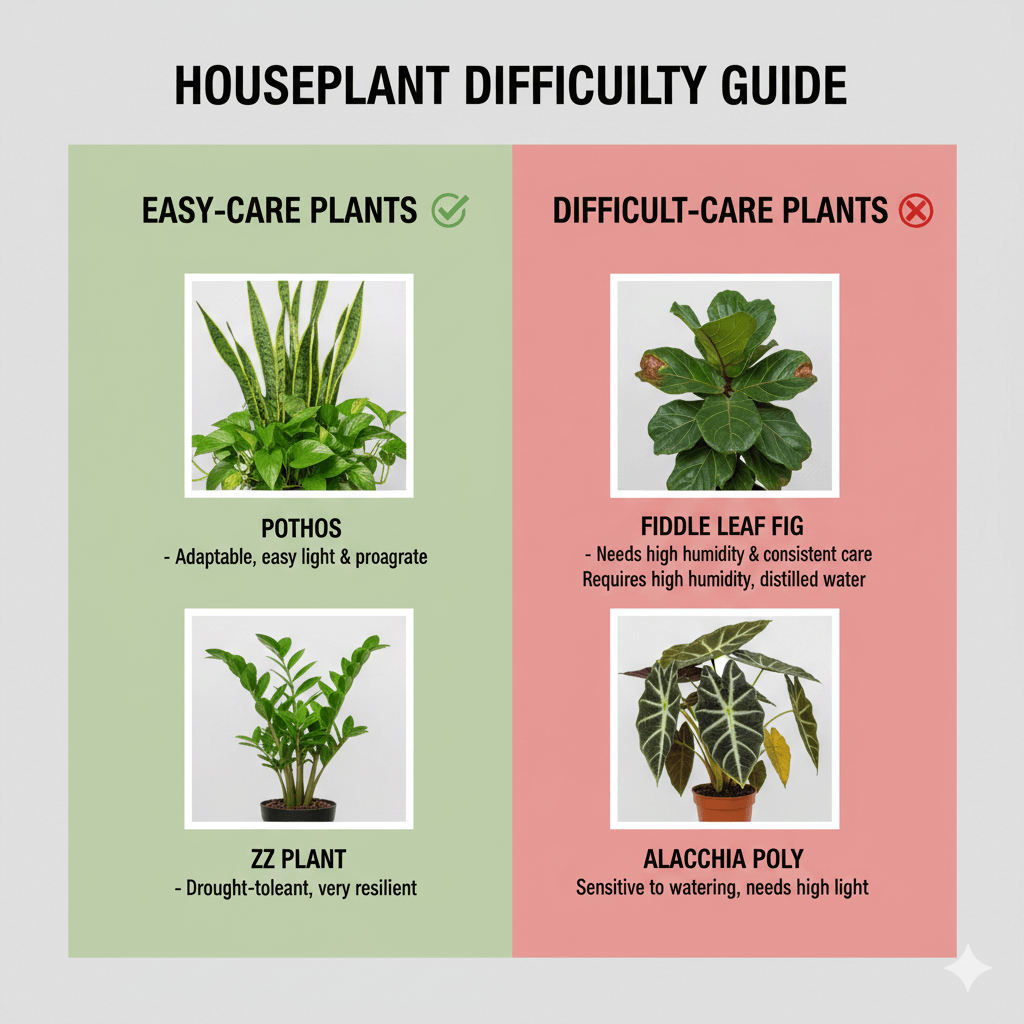
Beginner-Friendly Plants (Hard to Kill)
For Low to Medium Light:
- Pothos (golden, marble queen, jade) – literally unkillable
- Snake plant (sansevieria) – survives neglect beautifully
- ZZ plant – goes weeks without water
- Philodendron (heartleaf) – grows like crazy in medium light
- Cast iron plant – named for a reason!
My first successful plant was a golden pothos. I overwatered it, forgot to water it, moved it around constantly. It didn’t care! Just kept growing! This plant gave me the confidence to try others. If you’re starting out, get a pothos. You almost can’t kill them!
For Bright Light:
- Spider plant – makes tons of babies
- Jade plant – succulent that tolerates some neglect
- Aloe vera – medicinal and easy
- Cacti and succulents – water every few weeks
- Hoya – gorgeous and forgiving
These plants actually WANT lots of light. They get leggy and sad in low light. But give them a south or west window and they thrive! My jade plant sits in a south window and loves it. The leaves are plump and healthy. I water maybe twice a month. Perfect!
Plants That Are Actually Difficult (Despite Being Popular)
High Maintenance:
- Fiddle leaf fig (dramatic about EVERYTHING – light, water, humidity, drafts)
- Calathea (humidity diva, brown edges if humidity drops below 50%)
- Maidenhair fern (will die if you look at it wrong, needs constant moisture)
- String of pearls (picky about water, rots easily)
- Monstera deliciosa (needs space, support, bright light, consistent care)
Let’s talk about fiddle leaf figs because everyone wants one! They’re gorgeous on Instagram. But they’re SO dramatic! They drop leaves if you move them. They drop leaves if the light changes. They drop leaves if you water too much or too little. They get brown spots from tap water. They need bright, consistent light. Not beginner friendly at all!
I killed two fiddle leaf figs before I succeeded with my third one. And “succeed” is generous – it’s alive but not thriving. Just… existing. Meanwhile my pothos has tripled in size with zero drama. Choose wisely!
How to Choose Plants for YOUR Home
Step 1: Assess Your Light
- Walk around your home at different times of day
- Note which windows get light and when (south is brightest, north is dimmest)
- Be honest about light levels (don’t overestimate!)
- Use a light meter app if unsure
I thought my living room was “bright” until I actually measured it. It was medium at best! Most of the room was actually medium-low. This explained why my fiddle leaf fig hated it there! Now I know exactly which spots are bright, medium, and low. I choose plants accordingly!
Step 2: Consider Your Lifestyle
- If you travel frequently: Snake plant, ZZ plant, pothos (go weeks without water)
- If you forget to water: Succulents, snake plant, cast iron plant (drought tolerant)
- If you’re home and attentive: Calathea, ferns, orchids (can handle fussy plants)
- If you have pets: Research pet-safe plants (avoid pothos, philodendron, snake plant – all toxic!)
- If you have kids: Avoid toxic plants, choose sturdy options (spider plants, peperomia)
I travel for work sometimes. Used to come home to dead or dying plants! Now I only keep drought-tolerant varieties. My snake plants and ZZ plants don’t care if I’m gone for two weeks. They’re fine! My quality of life improved so much when I stopped fighting my lifestyle!
Step 3: Start Small
- Begin with 2-3 easy plants (don’t go overboard!)
- Learn their care requirements thoroughly
- Add more as you gain confidence
- Don’t buy rare/expensive plants until you’ve kept cheap ones alive for 6+ months
I see beginners buying $100 rare plants and killing them within a month. Start with a $15 pothos from the hardware store! Learn the basics. Once you keep that alive for six months, then invest in fancier plants. Save yourself the heartbreak and money!
Plant Selection Pros and Cons
Buying from Big Box Stores:
- Pros: Inexpensive ($5-20 typically), convenient locations, good for beginners learning
- Cons: Plants may be stressed from poor care, limited variety (mostly common plants), less specialized advice
I buy most of my plants from big box stores! They’re cheap, which means I don’t cry when I kill them while learning. The quality is hit or miss though. I inspect carefully before buying. Look for pests, check for root rot, make sure leaves aren’t yellowing!
Buying from Local Nurseries:
- Pros: Healthier plants, expert advice available, better quality overall, support local business
- Cons: More expensive ($20-50+), less convenient location usually, can be intimidating for beginners
My local nursery is amazing but plants cost 2-3x what big box stores charge. Worth it for special plants or when I want expert advice! The staff actually knows plant care. They’ve helped me troubleshoot problems. But for basic pothos or snake plants? I hit the big box store!
Buying Online:
- Pros: Huge selection, rare plants available, specialty vendors, delivered to door
- Cons: Shipping stress on plants, can’t see before buying, higher cost (plant + shipping), arrives dormant often
I’ve ordered plants online a few times. Mixed results! One monstera arrived perfect. Another pothos arrived with yellow leaves and had to recover for a month. Shipping stress is real! I only buy online for rare plants I can’t find locally. Otherwise I prefer seeing plants in person!
Pro Tip: Start with cheap plants from big box stores. Once you keep those alive for 6 months, then invest in more expensive plants! Don’t blow $100 on a rare variegated whatever until you’ve proven you can keep a $15 pothos alive. Trust me on this!
Soil Matters: Why Potting Mix Isn’t Optional
I used to think soil was soil. Then I planted a succulent in regular potting mix and watched it rot. Lesson learned the hard way!
Different plants evolved in different environments with different soil types. Desert plants (cacti, succulents) need fast-draining soil because rain is rare. Tropical plants need soil that retains some moisture. Using the wrong soil type is like trying to grow a cactus in a swamp or a fern in sand. It won’t work!
The Soil Mistake Everyone Makes
The biggest mistake? Using garden soil indoors! People think “soil is soil, right?” Wrong! Garden soil is designed for outdoors. It’s heavy and dense. It compacts in pots, suffocates roots, and doesn’t drain properly. Plus it often contains pests, weed seeds, and diseases. Never use garden soil for houseplants! Ever!
I tried this once because I was cheap. Had some garden soil left over from outdoor planting. Used it for repotting a philodendron. The plant struggled immediately! Soil stayed soggy forever after watering. Drainage was terrible. The plant got root rot within a month! Had to repot again with proper potting mix. Learned my lesson!
Different Soils for Different Plants
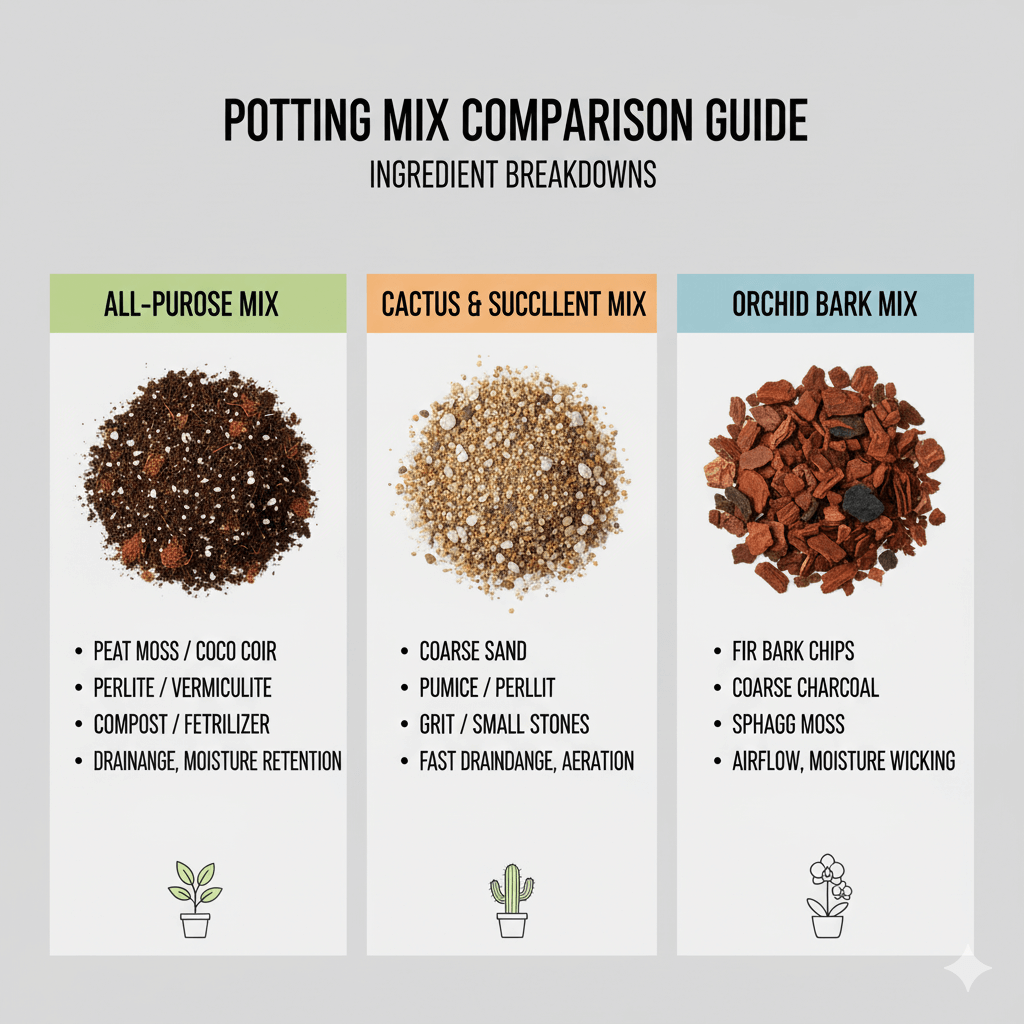
Standard Potting Mix:
- Best for: Most tropical houseplants (pothos, philodendron, monstera, peace lily)
- Contains: Peat moss or coir, perlite, vermiculite, sometimes bark
- Properties: Retains moisture but drains excess, light and fluffy, good aeration
This is your default! Works for 80% of common houseplants. I buy bags of standard potting mix and use it for almost everything. It’s formulated to be a good middle ground – holds enough moisture but doesn’t stay soggy!
Cactus/Succulent Mix:
- Best for: Cacti, succulents, jade plants, snake plants, ZZ plants
- Contains: Sand, perlite, minimal organic matter, sometimes gravel
- Properties: Fast-draining, doesn’t retain much water, mimics desert conditions
I killed three succulents before I learned they need special soil! Regular potting mix holds too much water. Succulents sit in moisture and rot. Cactus mix drains in seconds! Water runs right through. Perfect for plants that hate wet feet!
Orchid Mix:
- Best for: Orchids (obviously!), some epiphytic plants
- Contains: Bark chunks, charcoal, perlite, sphagnum moss
- Properties: Chunky, lots of air pockets, barely holds water
Orchid mix looks nothing like soil! It’s mostly bark chunks. First time I saw it, I thought “how is this soil??” But orchids are epiphytes – they grow on trees in nature! Their roots need air circulation. Regular soil would suffocate them!
Aroid Mix:
- Best for: Monstera, philodendron, pothos, anthurium
- Contains: Orchid bark, perlite, peat or coir, charcoal
- Properties: Well-draining but moisture-retentive, chunky texture
I make my own aroid mix! Mix potting soil with orchid bark and perlite. My monstera loves it! The bark creates air pockets (aroids like aeration) but the potting soil holds some moisture. Best of both worlds!
Soil Amendments: What They Do
Perlite (white, puffy pieces):
- Improves drainage dramatically
- Adds air pockets to soil
- Prevents soil compaction over time
- I add extra perlite to almost everything!
Vermiculite:
- Retains water and nutrients
- Improves aeration
- Good for moisture-loving plants (ferns, calathea)
Orchid Bark:
- Creates air pockets in soil
- Prevents compaction
- Perfect for aroids and orchids
- My secret weapon for heavy feeders!
Activated Charcoal:
- Prevents odors in soil
- Reduces bacteria growth
- Improves drainage
- Optional but nice for pots without drainage
I keep bags of perlite and orchid bark on hand. When I repot, I usually add extra to store-bought potting mix. Improves drainage and aeration! Most bagged mixes don’t have enough perlite for my taste. I like soil that drains quickly!
Soil Do’s and Don’ts
Do:
- ✓ Match soil to plant type (worth the extra effort!)
- ✓ Refresh soil every 1-2 years (soil breaks down and compacts)
- ✓ Add perlite if soil seems too dense (20-30% perlite is great)
- ✓ Buy pre-made mixes for beginners (easier than DIY mixing)
Don’t:
- ✗ Use garden soil indoors (too heavy, has pests, compacts badly)
- ✗ Reuse old soil without refreshing (depleted nutrients, potential pests/disease)
- ✗ Assume all potting soil is the same (quality varies wildly)
- ✗ Compact soil when repotting (roots need air pockets!)
The compacting thing is important! When you fill a pot with soil, don’t pack it down hard. Leave it loose and fluffy. Roots need air pockets to breathe. Compacted soil suffocates roots! I learned this after wondering why my newly repotted plants looked sad. I was packing soil way too tight!
Seasonal Care Changes: Your Plants Know It’s Winter!
This blew my mind when I first learned it. Plants aren’t stupid! They know when seasons change! Less light in winter? They notice. They go dormant or semi-dormant. Growth slows or stops. They need less water and zero fertilizer!
I used to water and fertilize the same year-round. Couldn’t figure out why my plants looked sad in winter! Turns out I was overwatering them. They weren’t actively growing, so they weren’t using much water. The soil stayed wet too long. I was setting them up for root rot!
Why Plants Act Different in Winter
- Less natural light (sun is lower in sky, days are shorter – less photosynthesis)
- Lower humidity (indoor heating dries the air dramatically)
- Cooler temperatures (especially near windows at night)
- Plants naturally slow growth or go dormant (evolutionary response to seasonal changes)
This is totally natural! In their native habitats, many tropical plants have dry and wet seasons. They’re programmed to slow down during certain times of year. Your home might be climate-controlled, but the light changes still trigger their seasonal responses!
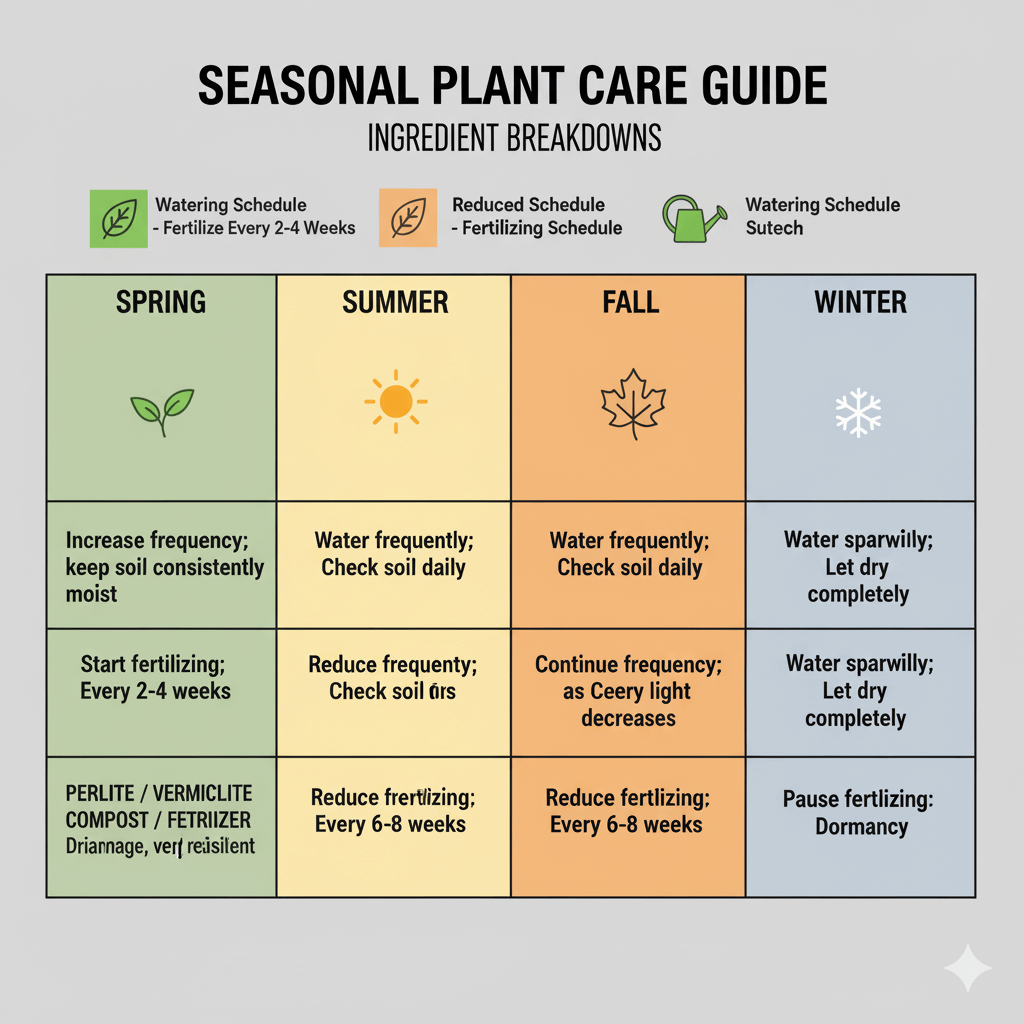
Seasonal Care Adjustments
Winter (November – February):
- Water LESS frequently (every 2-3 weeks for most plants instead of weekly)
- Stop fertilizing completely (plant is dormant, can’t use nutrients)
- Move plants away from cold windows at night (temperature drops can stress plants)
- Increase humidity (heating systems dry the air terribly)
- Accept that growth will slow or stop (this is NORMAL!)
- Watch for drafts from doors/windows (temperature fluctuations stress plants)
My first winter with plants was rough! I panicked when they stopped growing. I thought something was wrong! I was checking them daily, adjusting care constantly. Then I learned – they’re just dormant! Totally normal! Once I relaxed and adjusted watering, they were fine!
Spring (March – May):
- Gradually increase watering (plants wake up and start growing)
- Resume fertilizing (start at 1/2 strength, then increase)
- Best time to repot (plants are entering growth phase)
- Prune dead or leggy growth (encourages bushier new growth)
- Move plants closer to windows (can handle more light as they wake up)
- Expect new growth! (this is exciting after dormant winter)
Spring is like Christmas for plant people! Those first new leaves after winter dormancy are so exciting! My monstera puts out 3-4 new leaves in April/May. It’s thrilling every year!
Summer (June – August):
- Water more frequently (heat and light cause faster transpiration)
- Fertilize every 2-4 weeks (plants are actively growing)
- Watch for pests (they love warm weather – check plants weekly!)
- Provide extra shade if needed (too much summer sun can burn)
- Some plants can go outside (acclimate slowly! Don’t shock them!)
I put some plants outside in summer! My pothos and spider plants love it! They get bigger, lusher, more vibrant. But I acclimate slowly – start in full shade for a week, then gradually move to brighter spots. Direct sun would burn leaves if I moved them too fast!
Fall (September – October):
- Gradually reduce watering (plants are slowing down)
- Cut back on fertilizing (half as often, then stop)
- Bring outdoor plants inside before it drops below 60°F (don’t wait for frost!)
- Inspect for pests before bringing inside (quarantine if possible)
- Prepare for dormancy (accept slower growth is coming)
Fall transition is critical! You want to bring outdoor plants in before temperatures drop too much. But inspect them CAREFULLY first! Outdoor plants often have hitchhiker pests. I quarantine my outdoor plants in the garage for a week before bringing them inside. Check them thoroughly. Last thing you want is to bring spider mites inside to infest all your houseplants!
Winter Care Pros and Cons
Reducing Water in Winter:
- Pros: Prevents root rot, matches plant’s natural cycle, less work for you
- Cons: Easy to underwater sun-loving plants near windows, requires monitoring, can forget to water at all
Supplemental Grow Lights:
- Pros: Maintains growth through winter, prevents legginess, helps flowering plants
- Cons: Added electricity cost ($5-10/month), setup required, not necessary for all plants
I use grow lights for my finicky plants in winter! My calathea and ferns especially benefit. The extra light keeps them from getting too leggy. My snake plants and ZZ plants? They’re fine with just window light. Assess which plants actually need extra help!
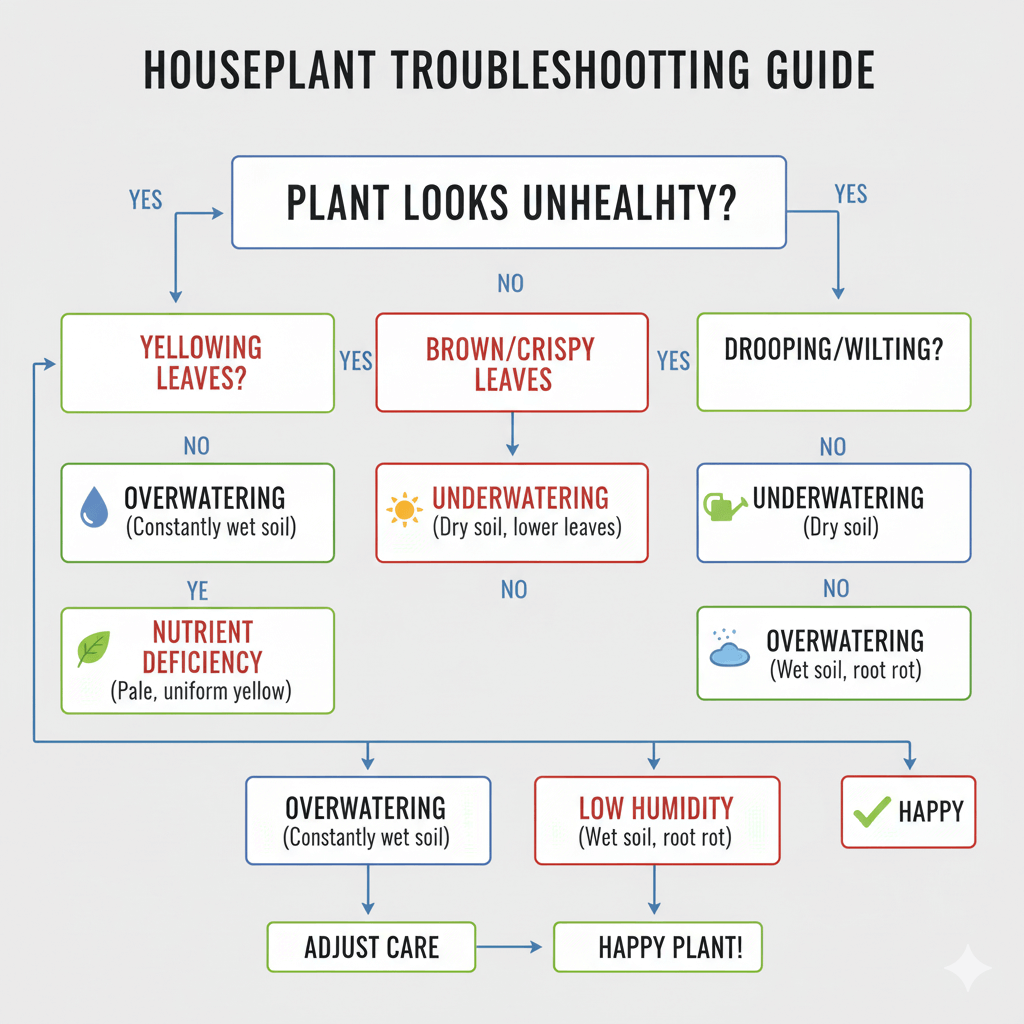
Troubleshooting: Common Problems and Quick Fixes
Let’s talk about the panic moments! When your plant suddenly looks terrible and you don’t know why. Been there! This section is your emergency guide!
Yellow Leaves
Possible Causes:
- Overwatering (MOST common – check if soil is wet!)
- Natural aging (lower leaves on older plants)
- Nutrient deficiency (pale yellow, usually older leaves first)
- Too much direct sun (bleached or faded appearance)
Quick Fix:
- Check soil moisture FIRST (stick finger 2 inches deep)
- Adjust watering schedule if soil is wet
- If only oldest, lowest leaves, this is normal aging
- Move away from direct sun if leaves look bleached
- Consider fertilizing if plant hasn’t been fed in 6+ months
One yellow leaf? Probably fine, just aging! Several yellow leaves appearing quickly? Problem! Check that soil!
Brown Leaf Tips
Possible Causes:
- Low humidity (most common – tips dry out)
- Fluoride/chlorine in tap water (sensitive plants hate this)
- Under-watering (soil drying out completely)
- Over-fertilizing (salt buildup burns tips)
Quick Fix:
- Increase humidity (grouping, humidifier, pebble tray)
- Use filtered or distilled water (or let tap water sit 24 hours)
- Check watering schedule (soil shouldn’t go bone dry repeatedly)
- Flush soil with plain water if over-fertilized
My calathea gets brown tips instantly if humidity drops! It’s my humidity indicator plant now. Brown tips = time to run the humidifier!
Drooping/Wilting
Possible Causes:
- Under-watering (soil is bone dry)
- Over-watering (soil is soaking wet but plant is wilting)
- Temperature stress (too cold or too hot)
- Root rot (advanced overwatering damage)
Quick Fix:
- Check soil first! (Is it wet or dry?)
- If dry → water thoroughly until drains out bottom
- If wet → check for root rot (pull plant out, look at roots)
- Ensure proper temperature (away from vents, drafts, etc.)
The wilting-despite-wet-soil situation is tricky! This usually means root rot. Roots can’t absorb water because they’re damaged. Pull the plant out and check roots. Healthy roots are white/tan and firm. Rotted roots are black/brown and mushy!
No New Growth
Possible Causes:
- Wrong season (winter dormancy – totally normal!)
- Insufficient light (plant is surviving, not thriving)
- Root-bound plant (no room for roots to expand)
- Lack of nutrients (soil depleted, needs fertilizer)
Quick Fix:
- Be patient in winter (most plants don’t grow November-February)
- Move to brighter location (closer to window or add grow light)
- Check if roots are crowded (repot if roots circling)
- Resume fertilizing in spring (diluted strength)
I panicked my first winter when plants stopped growing! Thought I was killing them. Nope! Just dormancy. Come spring, they exploded with new growth!
Leggy, Stretched Growth
Possible Causes:
- Insufficient light (THE main cause – plant is reaching for light)
- Over-fertilizing (too much nitrogen causes rapid, weak growth)
- Normal growth pattern for some vining plants
Quick Fix:
- Move closer to light source (this fixes 90% of legginess)
- Consider grow light for dark spaces
- Prune back for bushier growth (cut just above node)
- Reduce fertilizer if over-feeding
My pothos got so leggy in my bedroom! Stems were long with leaves far apart. Looked sad and sparse. Moved it closer to the window – new growth came in compact and bushy! Light makes all the difference!
Leaves Curling Inward
Possible Causes:
- Under-watering (plant conserving moisture)
- Too much light/heat (protecting leaf surface)
- Pest infestation (check for bugs!)
- Low humidity (moisture stress)
Quick Fix:
- Check soil and water if dry
- Move away from direct sun or heat source
- Inspect thoroughly for pests (especially undersides of leaves)
- Increase humidity if other factors are fine
Sudden Leaf Drop
Possible Causes:
- Temperature shock (cold draft, AC blast, sudden move)
- Change in environment (moved from store to home)
- Over or under-watering (stress response)
- Normal acclimation (plants dropping old leaves to adjust)
Quick Fix:
- Identify if change happened recently (new location, temperature swing)
- Give plant 2-3 weeks to acclimate before changing care
- Ensure watering is appropriate
- Don’t overreact and change everything!
Fiddle leaf figs are NOTORIOUS for this! Move them six inches? They drop leaves! It’s their dramatic way of adjusting. Just be patient!
Watering Tips: Getting It Right Every Time
Let me share my actual watering routine because this is what changed everything for me!
My Weekly Plant Check:
- Walk around to each plant
- Stick finger 2 inches into soil
- If dry at that depth, water thoroughly
- If still moist, skip it and check next week
- Empty saucers 30 minutes later
That’s it! No schedules, no guessing. Just check the soil. This simple routine keeps all my plants happy!
Watering Techniques That Actually Work
Bottom Watering:
- Fill saucer with water
- Let plant soak for 15-30 minutes
- Dump excess water
- Great for: African violets, plants with fuzzy leaves
I bottom water my African violets! Top watering leaves water spots on the fuzzy leaves. Bottom watering avoids this problem. The roots suck up exactly what they need!
Shower Method:
- Take plant to shower
- Use lukewarm water
- Rinse leaves and water soil thoroughly
- Let drain completely before returning
I shower my larger plants monthly! Cleans dust off leaves, waters thoroughly, and they love it! My monstera looks SO much better after shower days. The leaves are shinier and more vibrant!
Ice Cube Method:
- DON’T DO THIS
- Cold water shocks tropical roots
- Better to water properly with room temp water
Seriously, stop with the ice cubes! I keep seeing this hack. It’s terrible for plants!
Signs You’re Watering Correctly
- Consistent new growth during growing season
- Leaves are firm and perky
- No yellowing or browning
- Soil dries out in 7-14 days (depending on plant)
- Plant isn’t wilting between waterings
When I got my watering routine down, my plant success rate jumped from maybe 50% to 90%! It’s THE most important skill!
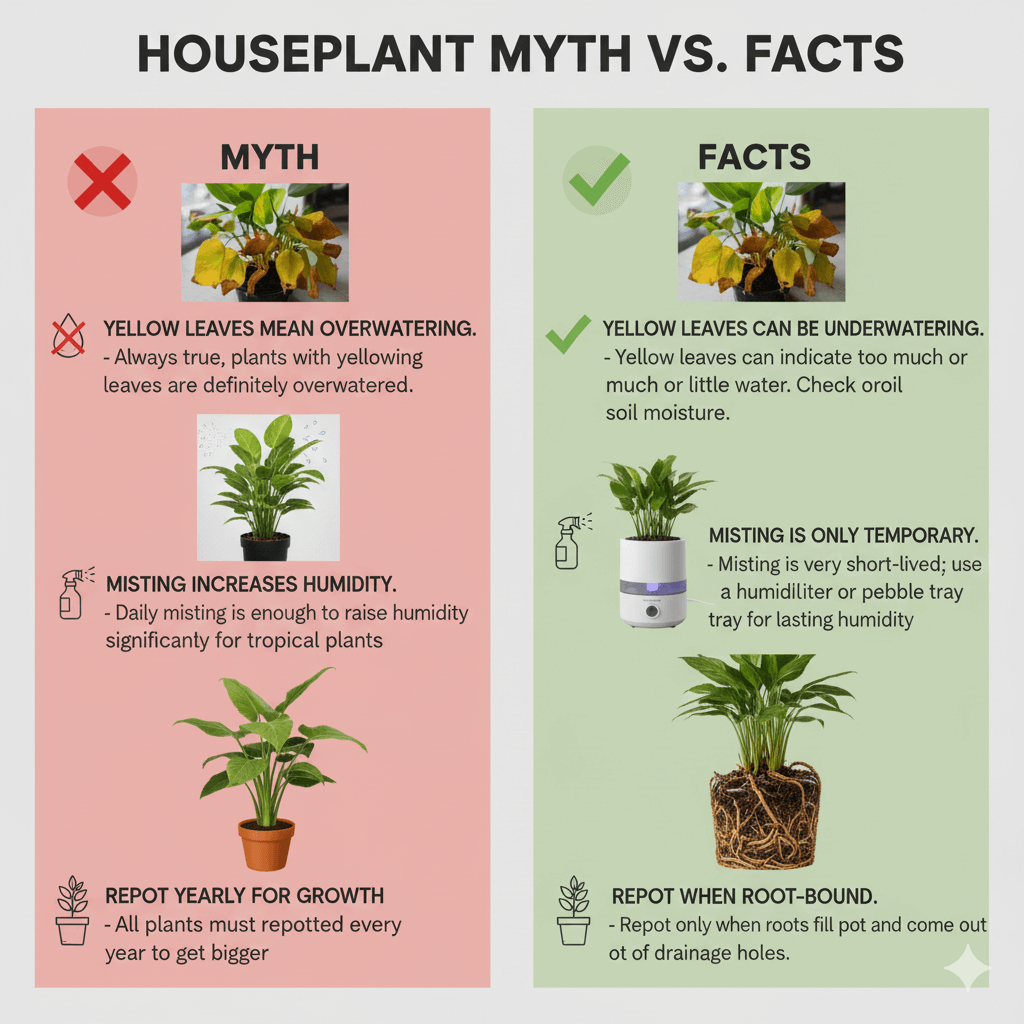
Common Myths Debunked
Let’s clear up some plant care myths that waste time and kill plants!
Myth #1: “Plants need water on a schedule”
- FALSE! Plants need water when soil is dry, not on calendar dates
- Variables: light, humidity, season, pot size all affect watering needs
- Check soil, don’t trust schedules!
Myth #2: “Misting increases humidity long-term”
- FALSE! Misting boosts humidity for 10-20 minutes max
- Better solutions: humidifier, grouping plants, pebble trays
- Misting is more about making YOU feel better than helping the plant!
Myth #3: “Talking to plants helps them grow”
- MOSTLY FALSE! The CO2 from your breath helps minimally
- What actually helps: Proper light, water, and care
- But if talking to plants makes you pay more attention to them, go for it!
I still talk to my plants though. It’s therapeutic for ME! And I notice problems faster because I’m looking at them closely!
Myth #4: “Brown tips mean under-watering”
- FALSE! Usually means LOW HUMIDITY or tap water issues
- Check: Humidity levels, water quality, fertilizer buildup
- Under-watering causes entire leaves to brown and crisp
Myth #5: “Bigger pots = bigger plants”
- FALSE! Oversized pots = overwatering risk
- Plants grow bigger in appropriately-sized pots with good care
- Go up only 1-2 inches when repotting!
This myth killed several of my plants! I thought I was helping by giving them “room to grow.” Nope! Just created soggy soil conditions!
Myth #6: “All houseplants purify air significantly”
- MOSTLY FALSE! You’d need hundreds of plants for meaningful air purification
- Plants do clean air, but at minimal levels in normal homes
- Grow plants because they’re beautiful, not for air cleaning!
The NASA study everyone quotes used sealed chambers and optimal conditions. Your living room is different! Don’t buy plants expecting them to replace your air purifier!
Myth #7: “Plants need drainage rocks at the bottom”
- FALSE! This creates a “perched water table” and makes drainage WORSE
- Just use pots with drainage holes
- Save yourself the hassle and the rocks!
I already ranted about this but it deserves repeating! This myth needs to die!
Building Your Plant Care Routine
Here’s how to make plant care easy and sustainable:
Daily (30 seconds):
- Quick visual check while passing by
- Notice any dramatic changes
- That’s it! Don’t overthink it!
Weekly (10-15 minutes):
- Check soil moisture on all plants
- Water those that need it
- Rotate plants 1/4 turn
- Quick pest inspection while watering
Monthly (30-60 minutes):
- Wipe leaves with damp cloth (removes dust)
- Inspect thoroughly for pests
- Prune dead/yellow leaves
- Check if any plants need repotting
Seasonally (1-2 hours):
- Adjust care for season (more/less water, start/stop fertilizing)
- Deep clean plant area
- Repot plants that need it (spring only)
- Assess what’s working and what’s not
This routine keeps my 30+ plants healthy without consuming my life! Consistency beats intensity!
Tools Worth Having
Essential ($30 total):
- Watering can with long spout
- Moisture meter
- Spray bottle for treatments
- Small pruning shears
Nice to Have ($50 additional):
- Humidifier
- Grow lights
- Hygrometer (humidity meter)
- Liquid fertilizer
Don’t Waste Money On:
- Expensive “plant food” that’s just diluted fertilizer
- Decorative pebbles for drainage (they don’t work!)
- Leaf shine products (just wipe with damp cloth)
- Fancy watering globes (inconsistent and often cause overwatering)
I’ve wasted money on SO much useless plant stuff! These recommendations come from hard-won experience!
Learn how to grow a beautiful garden at home, even if you’re just starting out.
When to Give Up on a Plant
Sometimes plants are too far gone. Here’s how to know:
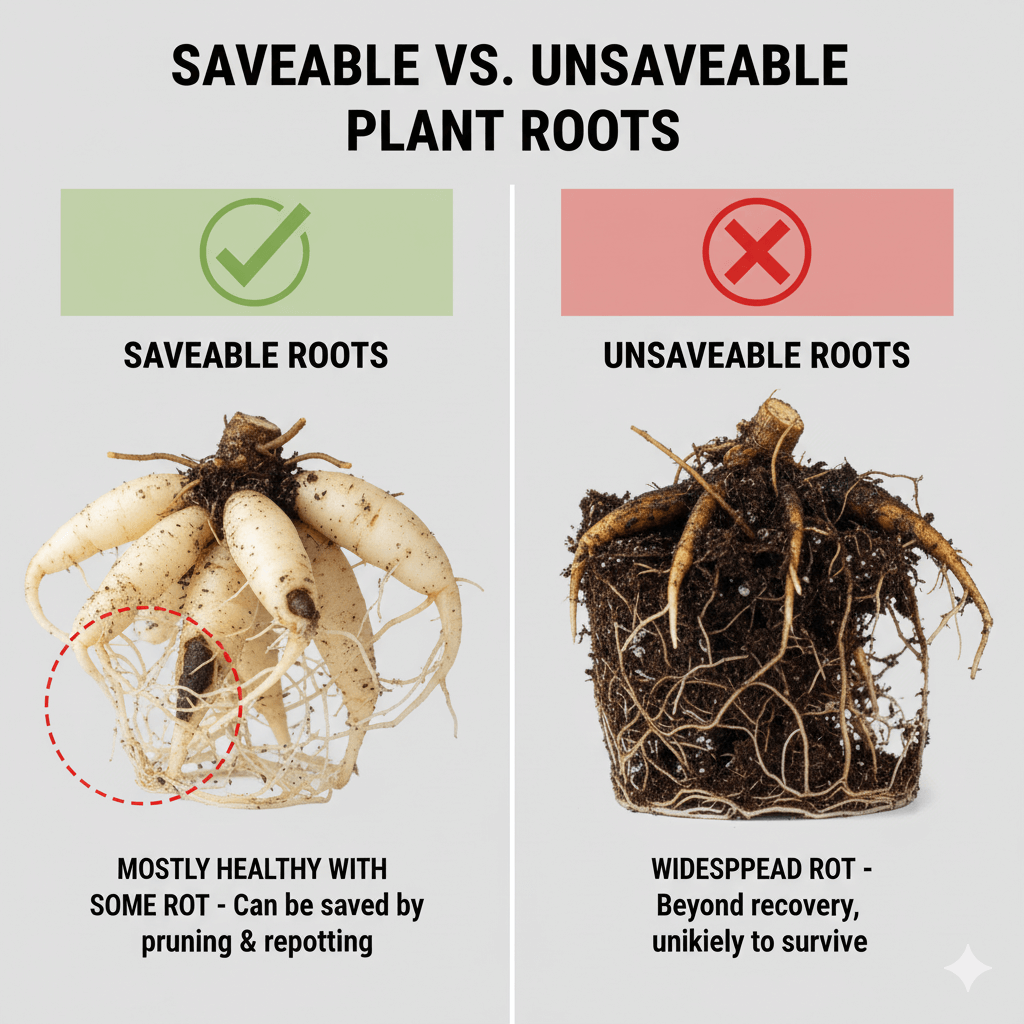
Signs a Plant Might Be Saveable:
- Some green growth remaining
- Some firm roots (even if others are rotted)
- Stem is still firm
- Problem identified and correctable
Signs a Plant Is Gone:
- Stem is mushy throughout
- All roots are black and mushy
- No green tissue anywhere
- Foul smell from soil/roots
I’ve tried to save plants that were clearly dead. It’s heartbreaking but sometimes you gotta accept defeat! Learn from what went wrong and try again with a new plant!
What to Do:
- Remove plant from pot
- Don’t reuse soil (may have disease/pests)
- Clean pot thoroughly with soap and water
- Start fresh with new plant and soil
Learning from Plant Deaths
Every dead plant taught me something:
- Overwatered pothos → learned about drainage importance
- Scorched monstera → learned about light intensity
- Spider mite-infested fiddle leaf fig → learned about prevention
- Frozen dracaena → learned about temperature needs
Don’t beat yourself up! Every expert plant parent has killed dozens of plants. It’s part of the learning process!
Conclusion: Your Houseplant Success Plan
Alright, let’s bring this all together! Keeping houseplants alive isn’t about having a “green thumb” – it’s about understanding what your plants actually need and avoiding the common mistakes that kill them.
The Non-Negotiables:
- Match the plant to your environment (light is KEY!)
- Use pots with drainage holes (seriously, this alone will save so many plants)
- Check soil before watering (stop watering on schedules!)
- Accept that less is usually more (resist the urge to fuss constantly)
Most plant deaths aren’t from neglect – they’re from too much attention! Overwatering, over-fertilizing, repotting unnecessarily. Sometimes the best thing you can do is leave your plants alone!
Your Action Plan:
This Week:
- Check all your current plants for drainage holes
- Assess light levels in different areas of your home (be honest!)
- Stick your finger in the soil – do they actually need water?
- Remove any decorative rocks from the bottom of pots (if you have them)
This Month:
- Research the specific needs of your plants (write it down!)
- Invest in a moisture meter ($10 well spent)
- Get proper soil for your plant types
- Consider a small humidifier if you have tropical plants
This Season:
- Start with 1-2 beginner-friendly plants if you’re new (pothos, snake plant)
- Keep a simple watering log (date and plant name – helps you learn patterns)
- Join online plant communities for support (r/houseplants is great!)
- Celebrate your wins (new leaf = major achievement!)
This Year:
- Build a consistent care routine (weekly watering checks, monthly deep care)
- Experiment with propagation (free plants!)
- Try one “challenge” plant when you’re ready
- Share your knowledge with other beginners!
Remember, every expert plant parent has killed multiple plants. I’ve definitely sent more plants to the compost bin than I’d like to admit! The difference is learning from those mistakes and adjusting your care routine.
The beautiful thing about plants is they WANT to live. They’re literally designed to grow! By fixing these common issues – especially overwatering and improper light – you’ll be amazed at how much easier plant care becomes.
My Final Thoughts:
After years of killing and reviving plants, here’s what I know for sure: Start small. Be patient. Check the soil. Give them light. Don’t overthink it!
Your plants aren’t judging you. They’re not going to die if you forget to water for an extra few days (unless they’re ferns, those drama queens). They’re tougher than you think!
And hey, if you kill a plant? You’re in good company! Every single plant parent has been there. Learn what went wrong, try again, and before you know it, you’ll have a jungle in your living room!
Now get out there and keep those plants alive! And hey, if you’ve got any tips or “plant murder” stories of your own, drop them in the comments. We’re all learning together, and sometimes the best lessons come from our biggest failures!
Your plants are rooting for you! (See what I did there?)